Categories
New York

Goal Setting

I’ve read all sorts of articles saying that the most sensible way to lose weight is to lose 1-2 pounds per week.  This translates into making only minor adjustments to how and what you eat.  That’s important because just the thought of “dieting” makes me hungry and depressed. The second part of the advice is to maintain or increase weight/resistance training so that you don’t lose muscle while you’re losing weight; you should try to reduce body fat only.

My idea is to cut down on calories but not so much that my body thinks it is starving and I end up as a yo-yo dieter.  Over the past few weeks, we’ve been eating more fruits and vegetables and reducing the number of snacks.  We’ve also been hiking, playing tennis and swimming.  My husband’s lost over 20 pounds!  I haven’t done as well although I am ahead of my 1 pound a week goal.  Happily, I am also down one dress size.

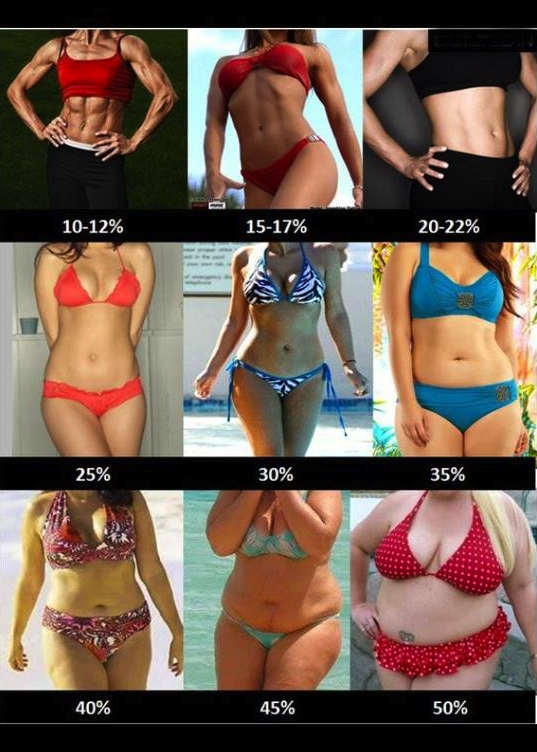
Under the Tools and Calculator tab, is a section called How much should you weigh?   The link brings you to the Fat2FitRadio.com  site.  They have a goal body weight calculator  that uses your body fat percentage and your lean body mass to gauge how much you should weigh.

The Fat2FitRadio.com site has a Calories and Basal Metabolic Rate (BMR) Calculator.  This calculator establishes the baseline number of calories you should eat on a daily basis AND the number of calories that you should start eating today and for the rest of your life  (http://www.fat2fitradio.com/tools/bmr/).  It is astonishing how many much calories they suggest you eat versus almost everyone else (including Sparkpeople.com).

BMR is the minimum number of calories your body needs to consume so that it works correctly; you also need calories/energy so that your body can perform basic activities.

Here are some basic weight exercises you can do while watching TV:

  •  Biceps –  alternating bicep curl. A bicep curl is the standard bicep workout done with hand weights. Doing an alternated curl means you switch back and forth between your arms so that you get an even workout.
    • Stand with your feet apart and flat on the ground. Hold a dumbbell in each hand and let each hand hang down at your side with your palms facing in towards each other.
    • Raise your right dumbbell so that it reaches shoulder height by curling your forearm up towards your chest. The underside of your forearm should face up towards the sky.
    • While lowering the right dumbbell, begin to lift the left one up in the same manner. Avoid jerking your body backwards to help you lift the dumbbells. If you are doing this, your dumbbells are too heavy.
  • Biceps –  hammer grab.
    • Grab a dumbbell in each of your hands so that your palms face in towards your body. Hold your arms down by your sides.
    • Curl your arms and lift the dumbbells so that the tops of the dumbbells comes toward your shoulders. The inner side of your forearm should be facing side.
  • Triceps – two-arm tricep extension. This workout only uses one dumbbell. You can do this while standing or sitting.
    • Grasp one dumbbell with both of your hands and hold it behind your head. Your arms should be bent into right angles with your forearms running along the sides of your head so that the dumbbell is in the back of your head.
    • Extend your elbows and lift your forearms so that they are pointed vertically above your head with the dumbbell. Hold that position for a moment and then lower them back to the right angle position behind your head.
  • Triceps – triceps kickback.  Place your left knee and left hand on to the flat surface of either the bed or bench. Your right leg should be straight against the side of the bed or bench.
    • Hold a dumbbell with your right hand. Your upper arm should be running parallel to your body and your palm should be facing your body.
    • Extend your elbow so that the dumbbell lifts up towards your back. Hold the dumbbell up for a moment and then release it back down.
    • Switch so that your right knee and right hand are on the bed and extend your left tricep.
  • Shoulders – palms-in shoulder press.
    • Stand up, holding dumbbells in both hands. Hold the dumbbells at shoulder level. Your palms should be facing each other.
    • Extend your elbows until the come close to locking. The dumbbells should get raised straight into the air–hold them in this position for a moment.
    • Slowly lower your arms so that the dumbbells are back at shoulder level.
  • Shoulders – lateral raise. You can also do these while sitting but instead of holding the dumbbells in front of you, hold them down by your sides.
    • Hold a dumbbell in each hand and hold your hands in front of your hips. Your palms should be facing each other.
    • Lift your arms out to your sides until they are almost parallel with the ground. Hold them in this position for a moment and then release them back down to your hips.
  • Back – wide row exercise.  For this exercise, keep in mind that you should breathe out when lifting the dumbbells up, and breathe in when releasing them back into resting position.
    • Get into a squatting position by flexing your hips and knees. Hold one dumbbell in each hand so that your palms are facing your body. The dumbbells should start just below your knees.
    • Lift the dumbbells straight up so that your arms form right angles. You should not alter how your knees and hips are bent.
    • Hold the dumbbells up for a moment and then let them slowly drop back down into resting position.


Categories
New York

Fighting a Fatty Liver

A couple of years ago my doctor asked me how much alcohol I was drinking because my blood test came back with abnormal results.  I don’t drink very much or very often so i was surprised by the question.  It turns out that the most common disease in America is called NALFD (non-alcoholic fatty liver disease) or fatty liver, for short, and is a major risk factor for diabetes, heart attacks, and even cancer. It can progress to Non Alcoholic Steatohepatis (NASH), which causes liver inflammation and can lead to cirrhosis or liver cancer in about 10% of those affected.

Fat and the liver: Though the exact effect of excess fat on the liver isn’t well understood, it appears to create problems on a spectrum. At the low and least harmful end, the liver may be able to perform its many functions even while it contains too much fat. However, once inflammation and swelling occur in the organ, scarring can result as the liver tries to heal itself. This is a hallmark symptom of liver injury in advanced non-alcoholic fatty liver disease: collagen is laid down, and fibrosis or thickening of the liver tissue ensues. As the disease progresses, about 10% of cases will develop over the next ten years into the much more serious NASH, or non-alcoholic steatohepatitis. NASH can lead to cirrhosis or hardening of the liver, liver failure, liver cancer, and death.

What causes it?  The high fructose corn syrup found in our processed foods is the single biggest cause of fatty liver. Soda, which, frighteningly, is the number one source of calories in the American diet, is the biggest cause of fatty liver.

Who gets non-alcoholic fatty liver disease? Though the exact causes of NAFLD are not known, most of the people who develop it are obese, have type 2 diabetes or have metabolic syndrome, which is associated with insulin resistance. What’s more, the severity of NAFLD increases with the degree of obesity, and abdominal or belly fat seems to increase the risk of dangerous NASH, even in patients with a body mass index (BMI) in a normal range.

Genetic factors influence each individual component of the syndrome, and the syndrome itself. A family history that includes type 2 diabetes, hypertension, and early heart disease greatly increases the chance that an individual will develop the metabolic syndrome.

Environmental issues such as low activity level, sedentary lifestyle, and progressive weight gain also contribute significantly to the risk of developing the metabolic syndrome.

Metabolic syndrome is present in about 5% of people with normal body weight, 22% of those who are overweight and 60% of those considered obese. Adults who continue to gain five or more pounds per year raise their risk of developing metabolic syndrome by up to 45%.

While obesity itself is likely the greatest risk factor, others factors of concern include:

  • Women who are post-menopausal
  • Smoking
  • Eating an excessively high carbohydrate diet
  • Lack of activity (even without weight change)

How do you know if you have it?

There are blood tests available that can detect a fatty liver. You can also see it on an ultrasound. And if your test comes back abnormal, you are in trouble. But even if your test comes back normal, you might not be out of the woods. It’s important to know that a liver function test doesn’t always detect a fatty liver. An ultrasound can be more sensitive.

The bottom line is, if you eat a lot of sugar and flour, if you have a little bit of belly fat, or if you crave carbs, starch, and sugar, you probably have this.

How to fix your fatty liver

The most promising treatments for NAFLD are weight loss (including bariatric surgery) and exercise. There are some really simple things you can do:

  • Cut out all high fructose corn syrup from your diet. If you see it on any label for any product—whether it’s a salad dressing or ketchup or tomato sauce—don’t eat it.
  • Reduce or eliminate starch. Get rid of white, processed flour. Even whole grain flours can be a problem.
  • Add some good things to your diet to help heal your fatty liver. Add plenty of fruit, vegetables, nuts, and seeds. Add lean animal protein like chicken and fish. Add good oils like olive oil, macadamia nut oil, avocados, coconut butter, and fish oil. Good fats like these are anti-inflammatory, and they help repair your liver.
  • Improve your metabolism through exercise. This is a fabulous way to improve insulin resistance and reduce fatty liver.
  • Supplements:  Polyunsaturated Fatty Acids (PUFA’s), can be helpful. Omega 3 fish oils have been shown to reduce fatty infiltration on ultrasound, and they’re also anti-inflammatory and reduce insulin resistance. A recent study used Cinnamon (1500mg) to treat NALFD and found that liver enzymes improved (as well as blood sugar, lipids and inflammation markers).

More information:

On a lighter note (pun intended) I really like doing the online Body Age quizzes. A thorough one (which incidentally gave me a happy analysis) can be found at: http://www.biological-age.com.

Categories
Calories Diet Fitness

Is Canned Tuna Good For You?

Looking at the problem with Ramen, I was worried that canned tuna fish – my next favorite for a quick and easy meal – may not be healthy for me either.  Happily, it looks like tuna fish is still good for you.  One article on Healthy Eating SFGate listed all sorts of happy news:

  • Omega-3 Fatty Acids: The small amount of fat present in canned light tuna is mostly the healthy unsaturated kind, including omega-3 fatty acids. Omega-3 fatty acids support a healthy brain and promote proper growth and development. These essential fatty acids reduce inflammation in your body, which can reduce your risk of heart disease, cancer and arthritis.
  • Niacin: A 3-ounce serving of canned light tuna contains 11.3 milligrams of niacin toward the 14 milligrams women need each day and the 16 milligrams that men need. Niacin is a B-vitamin that helps keep your digestive system, skin and nerves healthy.
  • Vitamin B12: You need 2.4 micrograms of vitamin B12 each day, and a 3-ounce serving of canned light tuna supplies 2.5 micrograms. Vitamin B12 supports the normal function of your brain and also aids in the formation of red blood cells.
  • Mercury: You can safely eat a serving of canned light tuna every three or four days and a serving of canned albacore tuna every nine-to-14 days, according to the Natural Resources Defense Council.

There’s only 179 calories in a can of tuna fish so it sounds like I may be eating a lot more of it at lunch.

Just as a side note, there was a recall of Bumble Bee and Chicken of the Sea cannd tuna fish in 2013.  “There have been no consumer reports of illnesses attributed to these products,” Steve Mavity, Bumble Bee’s senior vice president of technical services and corporate quality assurance, said in a statement. “But because we’ve identified an issue with seal tightness, we’re voluntarily recalling products to ensure the highest margin of safety and quality.” Loose seals and seams can lead to bacterial contamination, which can cause food poisoning, according to the FDA.

Chicken of the Sea and Bumble Bee, two of the major tuna brands that you’re likely to see on the shelf at your local grocery store, will combine into one as the owner of Chicken of the Sea.  The merger, if approved, would probably happen in the second half of 2015.

Greenpeace has posted notes that Bumble Bee and companies like it, continue to rely on fishing practices that kill millions of marine animals every year, including sharks, turtles, rays and juvenile fish of all kinds. These practices threaten the very ecosystems that will keep our oceans healthy for generations to come.

Categories
Diet Home

How Bad is Ramen Anyway?

marruchan ramenI love Maruchan Ramen noodles. Unabashedly.  I ate them a lot in high school and I still order them in large batches from Amazon.com.  They are fast and filling and warm during the winter months. I figured I was making Ramen more healthy by adding peas and/or carrots and, occasionally, chicken. Ingredients: Ramen Noodle: Enriched Wheat Flour (Wheat Flour, Niacin, Reduced Iron, Thiamine Mononitrate, Riboflavin, Folic Acid), Vegetable Oil (Contains One Or More of The Following: Canola, Cottonseed, Palm) Preserved By Tbhq, Salt, Soy Sauce (Water, Wheat, Soybeans, Salt), Potassium Carbonate, Sodium (Mono, Hexameta, and/Or Tripoly) Phosphate, Sodium Carbonate, Turmeric. Soup Base: Salt, Monosodium Glutamate “MSG”, Sugar, Hydrolyzed Corn, Wheat and Soy Protein

More recently, I thought I was really getting ahead of the cnonggshim noodleurve by purchasing Nongshim Spicy Chicken Noodle Bowls.  The label says there is no MSG added, and 0 g trans fat (although the Maruchan Ramen does not contain trans fat either.)  The Nonghim Noodles have an endorsement by Professional Chefs (a 2011 Chef’s Best Award)  and there’s 30% less sodium than their regular product.  They come in their individual bowls (yes, each bowl is 2 servings, go figure.) Ingredients: Wheat flour, palm oil, potato starch, modified potato starch, salt,contains less than 2% of each of the following: artificial flavor, beef extract*, beef fat*, beef stock*, black pepper*, calcium phosphate, chicken broth*, corn syrup*, dextrose, disodium guanylate, disodium inosinate, disodium succinate,dehydrated vegetables (carrot, green onion), garlic*, ginger*, gum arabic, hydrolyzed soy protein, lecithin (soy), malic acid, maltodextrin, modified corn starch, mushroom extract*, natural flavors, onion*, potassium carbonate, red chili pepper*, riboflavin (color), rice*, sand lance concentrate*, seaweed extract*, sodium carbonate, sodium phosphates, soybeans*, spices, sugar, tapioca starch, textured soy protein (soy flour, partially hydrogenated soybean oil, salt, yeast extract), tocopherols (antioxidant), yeast extract, yellow corn flour. *powdered contains wheat, soy, and sand lance. Manufactured in a facility that also processes crustacean shellfish and milk.

Here’s the bad news.  Apparently, Ramen isn’t bad for you just because of the sodium. There are a number of articles that noting just how bad Ramen noodles are and how they will kill you. What can you do if you still want Ramen?  Most recommendations to make Ramen healthier is to add vegetables, as I have done.  One site recommends that once your noodles are a little over halfway cooked, (still al-dente) dump the cooking water out and drain the noodles. Put another 2 cups of water on the stove.  (Hey you just discarded a lot of gross starch and a fair amount of fat!).

If you want to read more, here is a good article:

The Street.com – Ramen Noodles May Lead to Chronic Illness: The article uses data from WebMD and, most importantly, findings from a new study by Baylor University. The study was published in The Journal of Nutrition and shows that consumption of instant noodles significantly ups the risk of a scary condition for certain groups of people.

  • Cardiometabolic Syndrome – Cardiometabolic syndrome is a scary condition ; a Baylor study found that eating instant noodles two or more times a week was associated with the syndrome, which raises a person’s likelihood of developing heart disease and other conditions, such as diabetes and stroke.  Ladies, pay attention to this: Women (specifically South Korean), not men, who ate instant noodles at least twice a week showed a 68% higher risk of metabolic syndrome.
  • Noodles: In order to create a long keeping noodle that can be on store shelves or in your kitchen cupboard for 4 to 12 months, it’s deep fried in oil. That’s right, they are fried noodles.
  • BPA Chemicals: Bisphenol A (BPA), is used for packaging the noodles in polystyrene foam containers. Studies have shown that BPA can affect the way hormones send messages throughout our body, specifically the primary female sex hormone, estrogen.
  • Salt: Ramen is high in sodium, packed with 41% of your daily allowance with each package. Most of this sodium is in the flavoring packet. Using less flavoring, which is mostly salt, will reduce the sodium content. Also remember that eating too much sodium can increase a person’s risk of heart failure, osteoporosis, stroke, high blood pressure and heart disease.
  • Flavoring Packet: The flavoring powder is made of salt, monosodium glutamate, seasoning, and sugar. The worst ingredient is the MSG, or monosodium glutamate. That’s the “flavor enhancer” used to improve all kinds of tastes. Instant noodle makers use it to make their shrimp flavors taste more like shrimp, and beef flavors more like beef.
  • Fat: One 85 gram package of ramen noodles has 14.5 grams of fat. The unhealthy saturated fats make up 6.5 grams, which is about one third of your daily allowance. The remainder of the fats are polyunsaturated and monounsaturated fats.

Another issue is that Ramen noodles contain Tertiary-butyl hydroquinone (TBHQ), which is a byproduct of the petroleum industry and food additive frequently to preserve cheap processed foods. In processed foods, it’s sprayed on the food or on its packaging to prevent discoloration and changes to flavor and odor. Others products, such as cosmetics, perfumes, varnishes and lacquers, contain TBHQ to maintain stability.

Small amounts of TBHQ may not kill you (although death has occurred) or even make you feel immediately sick, but it can have a long term effect on your health such as weakening of organs and contributing to the onset of cancers and tumors.


Categories
Calories Fitness Home New York Tools Weight

Using The Tools on This Site

I wanted to revisit all the Fitness tools and Calculators included on this site.  I had mixed results but the bottom line is that my tummy must be trimmed down. Stepping through the main page, we have the:

  • Body Fat Calculator  from http://www.fat2fitradio.com/tools/bf/  The formula provided will not calculate your exact body fat percentage but should give you a consistent measurement you can use as a guideline and determine if you’re losing body fat and/or muscle. Oddly, the calculation says I have body fat percentage is 27.4%.  My scale tells me it is 39%. I think I’m measuring something incorrectly.

    From http://www.fat2fitradio.com/
    Fat 2 Fit #144 – New Measurements Of Success Written on March 3, 2013 – 12:00 am | by Helana Brigman

Looking at this photo, I’m sadly inclined to believe my scale.

  •  How much should you weigh?  Inputting 39% body fat into the Fat 2 Fit Tool, the ideal weight for my age with 35% body fat is 168 pounds.  That seems doable.
  • Calories and Basal Metabolic Rate (BMR) –  Fat 2 Fit Tools advocates eating like the thin, healthy person that you want to become. The calorie levels in the chart are not extreme, but  create that all important caloric deficit that is required to get you to your goal weight in a safe manner.  Based on my goal weight of 168 and assuming light exercise/sports 1-3 days/week,  the tool suggests a daily caloric intake of 2005! As I get closer to my goal weight, my weight loss will start to slow down. It is OK to eat a few hundred calories less per day (200-300) to speed up your weight loss at this point.
  • Covert Bailey Body Fat Calculation – The formulas in this body fat calculation are based on the Covert Bailey book The Ultimate Fit or Fat. The formula does not calculate your exact body fat percentage but should give you a consistent measurement you can use as a guideline and determine if you’re losing body fat and/or muscle.  Again, this weirdly gave me a body fat percentage of 27.8%.  This is not right.
  • Waist to Hip Ratio – Carrying extra weight around your middle, indicated by a high waist to hip ratio, increases health risks associated with obesity.  This tool tells me my Waist to Hip ratio is: 0.93.  Anything over 0.85 signifies a high health risk!
  • Waist to Height Ratio – The waist to height ratio is the best predictor of cardiovascular risk and mortality. My Waist to Height Ratio is 58.3%.  According to the tool, a ratio 54 to 58 means “Seriously Overweight” and a ratio over 58 means “Highly Obese“. That’s not good.
Categories
Exercise Fitness Home Kickboxing sports Travel

Basic Home Kickboxing Workout

OK- It’s been a couple of years since I’ve had a gym that offers kickboxing classes near to me anymore so I thought I would start up again with the very basics. I’ve copied a Fitness Magazine article that includes a 10 minute kickboxing workout [with pictures] into my Guidance and Exercise section.  There is a nice short workout and illustrates how to do each move.

10-Minute Fat-Burning Routine (Do it twice and you’ll burn about 170 calories.)

Minutes: Combination Moves:
0:00–2:00 Jab, cross, hook, uppercut lead with left (30 seconds each)
2:00–4:00 Jab, cross, hook, uppercut lead with right (30 seconds each)
4:00–5:00 Front Kick (30 seconds each, left and right)
5:00–6:00 Roundhouse kick (30 seconds each, left and right)
6:00–7:00 Side kick (30 seconds each, left and right)
7:00–7:30 Combination (left foot forward): Jab (L),  uppercut (R), Front Kick  (L)
7:30–8:00 Combination (right foot forward): Jab (R), uppercut (L),  Front Kick   (R)
8:00–8:30 Combination (left foot forward): Jab  (L), cross (R), Roundhouse kick  (L)
8:30–9:00 Combination (right foot forward):  Jab  (R), cross (L),  Roundhouse kick  (R)

 Kickboxing is great because it:

  • Burns an average of 500 calories an hour (some estimates reach 810)
  • Targets your arms, shoulders, abs, thighs, and butt in one workout
  • It’s an amazing stress release (how often do you get to pretend you’re beating up your archenemy?)

Workout designed by Ilaria Montagnani, creator of Powerstrike kickboxing and a black belt in karate.


Categories
Calories Exercise Fitness Home

Adding a Hula Hoop to My Day

In the interest of trying something new and fun, I have purchased a weighted Hula Hoop.  I spent 10 minutes this morning listening to music and hooping.  It wasn’t bad although I had to learn to keep my elbows out of the way! You supposed to hula hoop in both directions. Mix it up alternating between clockwise and counter-clockwise direction.

Benefits

Hooping is a great ab workout to start with before integrating other exercises into your routine.  Because a hoop workout requires constant push-pull contractions in your core muscles (abs plus obliques, at the sides of your waist) as well as in the glutes and thighs, the added resistance created by a somewhat heavier hoop should sculpt and reshape all the right places.  For what it’s worth there are also many references to unnamed studies stating hooping is an effective way to burn visceral fat  which is deep within the abdominal cavity.  Visceral fat is also linked to metabolic disturbances and shows an increased risk for cardiovascular disease, type 2 diabetes, and many other dangerous health conditions.

Here’s some advice I found on Hula Hooping:

The Mayo Clinic reports that you need to spend at the very least 10 minutes at a timWeighted Hula Hoope exercising your abs with the Hula-Hoop in order to see concrete results. An average woman can burn about 165 calories in 30 minutes of hula hooping, and an average man can burn about 200 calories in 30 minutes of hula hooping.

1.    Stabilize your torso and legs, and mobilize your midsection. Only use your abdominal muscles and hips to keep the hoop spinning.

2.    Scoop your belly in and lift your rib cage. Extend from the center of your body out. The better your posture, the easier it will be to hoop.

3.    Hold the hoop parallel to the floor as you start the spin, and give it some good momentum so it doesn’t start out wobbly.

4.    If your hoop starts to fall, lengthen your spine, push forward and back, and move faster. Imagine yourself as the axis of the orbit, not the orbit itself. If you try to move with the hoop (rotating your hips in a circle) the hoop will lose momentum and fall. Move side to side with your waist and hips or back to front with your belly. Feel the centrifugal force, but don’t try to be the circle; let the circle move around you.

5.    Stick with it. The longer you hoop, the more your body gets used to the movements


Categories
Exercise Fitness Home Travel Weight

New Baseline Test 2015

Time to retest baseline fitness!  (It’s been a crazy couple of years so I did not have high expectations.)  I used the tests outlined on The TopEnd Sports Page.  These are tests that can be done at home with minimal or no equipment. The tests are designed to quickly gauge a person’s general fitness level and to act as a benchmark for future testing. After taking the test, you may wish to train for a few months. Then, take the test again and compare the results.

Although there are six tests, I did only the first three — Push ups, Sit ups and Squats.

  1. Push ups to test upper body strength.
  2. Sit ups to test abdominal or trunk strength.
  3. Squats to measure lower body strength.
  4. Vertical Jump to measure leg explosive power.
  5. Step test to measure aerobic endurance.
  6. Sit & Reach to measure flexibility.

Push Ups:  I did the modified push up with a “bent knee” position. (To do this, kneel on the floor, hands on either side of the chest and keep your back straight. Lower the chest down towards the floor, always to the same level each time, either till your elbows are at right angles or your chest touches the ground.)  I was able to complete 35 push ups vs the 25 expected for my age group. Woo Hoo!

Sit Ups:  You must count the number of sit ups you can do within one minute.  The sit ups required that you (a) squeeze your stomach, (b) push your back flat and (c) raise high enough for your hands to slide along your thighs to touch the tops of your knees. I was able to do 45 sit ups versus the 27 expected for my age group.  Again, I was cooking with gas.

Squats:  The test has you stand in front of a chair or bench with your feet at shoulder’s width apart, facing away from it. Placing your hands on your hips,  you squat down and lightly touch the chair before standing back up. A good sized chair is one that makes your knees at right angles when you are sitting. You keep doing this until you’re fatigued.  I was able to complete 20 squats which is the level appropriate for my age group but I have to admit that I was not lightly touching the chair before standing back up.  My knees were making a racket as well.  I will stay away from squats for the time being.

Listening to old episodes of Fat2Fit radio (still my favorite although they’ve stopped recording), I remembered that I have to do weight training so I get my metabolism at a higher rate.  I think it’s great that I can do some light weight training at home or while traveling with little or no equipment.  Good luck with your training everyone!

Categories
Exercise Hawaii Home Injuries

Fixing my Feet

Along the way, my Plantar Fasciitis seems to have flared up again.  Plantar fasciitis is caused because the tough, fibrous band of tissue (fascia) connecting the heel bone to the base of the toes has become inflamed.  Overweight women, like myself, are more likely to develop the condition.  Walking a lot on hard surfaces makes it worse, so our long walks into town were making it worse.  The pain classically occurs right after getting up in the morning and after a period of sitting. The excruciating pain in my heel bone was often felt worse after (not during) exercise.

According to my research, stretching is the best treatment for plantar fasciitis.  I found this exercise to be the most helpful:

  • Plantar fascia stretch: Stand with the ball of your injured foot on a stair. Reach for the bottom step with your heel >until you feel a stretch in the arch of your foot. Hold this position for 15 to 30 seconds and then relax. Repeat 3 times. After you have stretched the bottom muscles of your foot, you can begin strengthening the top muscles of your foot.

FootCareMD suggests the following

  • Lean forward against a wall with one knee straight and heel on the ground. Your other knee is bent. Your heel cord and foot arch stretch as you lean. Hold for 10 seconds, relax and straighten up. Repeat 20 times for each sore heel. It is important to keep the knee fully extended on the side being stretched.
  • Lean forward onto a countertop, spreading your feet apart with one foot in front of the other. Flex your knees and squat down, keeping your heels on the ground as long as possible. Your heel cords and foot arches will stretch as the heels come up in the stretch. Hold for 10 seconds, relax and straighten up. Repeat 20 times.
  • Plantar Fascia-Specific Stretching Program
    From American Orthopaedic Foot & Ankle Society (AOFAS) http://www.aofas.org/footcaremd/Pages/footcaremd.aspx
      1. Cross your affected leg over your other leg.
      2. Using the hand on your affected side, take hold of your affected foot and pull your toes back towards shin. This creates tension/stretch in the arch of the foot/plantar fascia.
      3. Check for the appropriate stretch position by gently rubbing the thumb of your unaffected side left to right over the arch of the affected foot. The plantar fascia should feel firm, like a guitar string.
      4. Hold the stretch for a count of 10. A set is 10 repetitions.

The good news is that my foot feels so much better!  We have even begun playing tennis in the mornings.

Here is a great list of exercises that you can follow. Plantar Fascitis Exercises-1.  Stick to it if you have problems with foot pain, plantar fasciitis, and or heel pain.

I also use the Active Ankle Dns Dorsal Night Splint Active Ankle Dns Dorsal Night Splint when I go to bed.  It’s been very helpful too.


Categories
Travel

The Lanikai Pillbox Trail

We did the Lanikai Pillbox Hike on the Ka’iwa Ridge Trail in Oahu with Liz and Becca. The beginning of the trail is steep but the views of Lanikai and Kailua beaches are great. Currently, the state owns 4.07 acres of Lanikai Pillboxes trail, but it does not maintain the trail or put up signs on it. It is deemed an “unimproved trail.” That means it is not designated for public use or maintenance.
More information on Hawaiian walking trails can be found here:
http://alltrails.com/trail/us/hawaii/kaiwa-ridge-pillbox-trail

Desciption of the Lanikai ‘Pillbox’ Trail:

Kaiwa Ridge (Pillbox) Trail  by Randy Rodriguez
Kaiwa Ridge (Pillbox) Trail by Randy Rodriguez
  • The short, steep hike to the pillboxes offers breathtaking views of the Mokulua Islands and Koolua Mountains.   While it is unclear how many were actually constructed, we do know that both the Lanikai and Diamond Head pillboxes were part of the island’s defensive system. They reportedly were observation posts built between World Wars I and II, which could alert shore artillery batteries to any approaching enemy ships. Eventually they were stripped out and left abandoned by the military. [The Kailua Chamber of Commerce]
  • The two famed Lanikai  “pillboxes” on the trail are misnamed. In military terms, a pillbox means a defensive site such as a machine gun pillbox. The two concrete structures on Kaiwai Ridge were built to be observation stations, not sites for defensive armaments. Military historian John D. Bennett says the observation stations were constructed in 1943 and equipped with high-powered telescopes to fix positions of possible enemy ships. The job of the soldiers working in the structures was to transmit target information to artillery batteries on the Mokapu Peninsula, and later to serve batteries at the Kaneohe Bay Naval Air Station and Puu Papaa.   [Denby Fawcett]
  • Part of network of coastal artillery, Fire-control station “Podmore” was built in 1942 to direct fire from the 3 and 5 inch guns of former Battery Wailea.  Each held optical range finding equipment to target the artillery in the event of a Japanese landing during WWII. [XP Not So Great Hiking Blog ]