Categories
Exercise Fitness

Gentle Knee Stretches and Strengthening Exercises to Decrease Pain

Time to get my knees back into the game! Found some very gentle knee stretches and knee strengthening exercises on the Sparkspeople.com site.  I’ve supplemented their text with videos.

Knee Stretches

Chair knee extension: Sitting in a chair, rest your foot on another chair so the knee is slightly raised. Gently push the raised knee toward the floor using only leg muscles. Hold for 5 – 10 seconds and release. Repeat 5 times on each leg.

Heel slide knee extension: Lie on your back, with left knee bent and left foot flat on floor. Slowly slide the left heel away from your body so both legs are parallel. Hold for 5-10 seconds, return to starting position. Repeat 5 times on each leg.

Knee flexion: Sitting in a chair, loop a long towel under your foot (resting on the floor). Gently pull on the towel with both hands to bend the knee, raising your foot 4 – 5 inches off the floor. Hold for 5 – 10 seconds, then release. Repeat 5 times on each leg.

Hamstring stretch: Standing, put one foot in front of you, toes up. With hands on the small of your back (or one hand holding a chair for balance), bend the opposite knee and hip (not your lower back), until you feel the hamstrings stretch. The upper body comes forward at the hip. Hold for 5 -10 seconds, then release. Repeat 5 times on each leg.

Knee Strengthening Exercises

  1. Wall slide: Leaning with your back against a wall, bend your knees 30°, sliding down the wall, then straighten up again. Move slowly and smoothly, using your hands on the wall for balance. Keep feet and legs parallel, and do not allow knees to go out over the toes. Repeat 5 -10 times.
    Wall Slides for Knees


  2. Straight-Leg Raises: Sitting in a chair, straighten one leg in the air (without locking the knee). Hold for about one minute. Bend your knee to lower the leg about halfway to the floor. Hold for 30 seconds. Return to starting position. Work up to 4 reps on each leg.

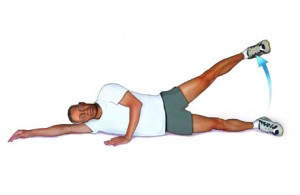
  1. Abductor Raise: Lie on your side, propped on one elbow. The leg on the floor bent, the other straight. Slowly lift the top leg, hold for 5 -10 seconds, then lower. (Ankle weights will increase the intensity). Do 1-3 sets with 12-15 repetitions each. Remember to rest in between sets.
  2. Hamstring Curl: Stand with the front of your thighs against a surface (a table or wall). Flex one knee up as far as is comfortable. Hold for 5 – 10 seconds, then lower slowly. If possible, do not touch the floor between repetitions. (Ankle weights will increase the intensity.) Do 1-3 sets with 12-15 repetitions each. Remember to rest in between sets.
  3. Step-Ups: Stand in front of a step, like a sturdy bench or stairs, about two feet high (or less if necessary). Step up onto the support, straighten your knees fully (without locking them) and step down. Maintain a steady pace. If you are comfortable with your balance, pump your arms while doing this exercise. Start with 1 minute, slowly building your time. Gets your heart pumping too!
  4. Stationary Bike: Biking is a good way to increase strength and range of motion. Make sure you have the right positioning of the legs. At the bottom of the pedal stroke, the bend in the knee should be 15 degrees. Start with 10 minutes and slowly increase your time.
Categories
Calories Diet Fitness

Is Canned Tuna Good For You?

Looking at the problem with Ramen, I was worried that canned tuna fish – my next favorite for a quick and easy meal – may not be healthy for me either.  Happily, it looks like tuna fish is still good for you.  One article on Healthy Eating SFGate listed all sorts of happy news:

  • Omega-3 Fatty Acids: The small amount of fat present in canned light tuna is mostly the healthy unsaturated kind, including omega-3 fatty acids. Omega-3 fatty acids support a healthy brain and promote proper growth and development. These essential fatty acids reduce inflammation in your body, which can reduce your risk of heart disease, cancer and arthritis.
  • Niacin: A 3-ounce serving of canned light tuna contains 11.3 milligrams of niacin toward the 14 milligrams women need each day and the 16 milligrams that men need. Niacin is a B-vitamin that helps keep your digestive system, skin and nerves healthy.
  • Vitamin B12: You need 2.4 micrograms of vitamin B12 each day, and a 3-ounce serving of canned light tuna supplies 2.5 micrograms. Vitamin B12 supports the normal function of your brain and also aids in the formation of red blood cells.
  • Mercury: You can safely eat a serving of canned light tuna every three or four days and a serving of canned albacore tuna every nine-to-14 days, according to the Natural Resources Defense Council.

There’s only 179 calories in a can of tuna fish so it sounds like I may be eating a lot more of it at lunch.

Just as a side note, there was a recall of Bumble Bee and Chicken of the Sea cannd tuna fish in 2013.  “There have been no consumer reports of illnesses attributed to these products,” Steve Mavity, Bumble Bee’s senior vice president of technical services and corporate quality assurance, said in a statement. “But because we’ve identified an issue with seal tightness, we’re voluntarily recalling products to ensure the highest margin of safety and quality.” Loose seals and seams can lead to bacterial contamination, which can cause food poisoning, according to the FDA.

Chicken of the Sea and Bumble Bee, two of the major tuna brands that you’re likely to see on the shelf at your local grocery store, will combine into one as the owner of Chicken of the Sea.  The merger, if approved, would probably happen in the second half of 2015.

Greenpeace has posted notes that Bumble Bee and companies like it, continue to rely on fishing practices that kill millions of marine animals every year, including sharks, turtles, rays and juvenile fish of all kinds. These practices threaten the very ecosystems that will keep our oceans healthy for generations to come.

Categories
Calories Fitness Home New York Tools Weight

Using The Tools on This Site

I wanted to revisit all the Fitness tools and Calculators included on this site.  I had mixed results but the bottom line is that my tummy must be trimmed down. Stepping through the main page, we have the:

  • Body Fat Calculator  from http://www.fat2fitradio.com/tools/bf/  The formula provided will not calculate your exact body fat percentage but should give you a consistent measurement you can use as a guideline and determine if you’re losing body fat and/or muscle. Oddly, the calculation says I have body fat percentage is 27.4%.  My scale tells me it is 39%. I think I’m measuring something incorrectly.

    From http://www.fat2fitradio.com/
    Fat 2 Fit #144 – New Measurements Of Success Written on March 3, 2013 – 12:00 am | by Helana Brigman

Looking at this photo, I’m sadly inclined to believe my scale.

  •  How much should you weigh?  Inputting 39% body fat into the Fat 2 Fit Tool, the ideal weight for my age with 35% body fat is 168 pounds.  That seems doable.
  • Calories and Basal Metabolic Rate (BMR) –  Fat 2 Fit Tools advocates eating like the thin, healthy person that you want to become. The calorie levels in the chart are not extreme, but  create that all important caloric deficit that is required to get you to your goal weight in a safe manner.  Based on my goal weight of 168 and assuming light exercise/sports 1-3 days/week,  the tool suggests a daily caloric intake of 2005! As I get closer to my goal weight, my weight loss will start to slow down. It is OK to eat a few hundred calories less per day (200-300) to speed up your weight loss at this point.
  • Covert Bailey Body Fat Calculation – The formulas in this body fat calculation are based on the Covert Bailey book The Ultimate Fit or Fat. The formula does not calculate your exact body fat percentage but should give you a consistent measurement you can use as a guideline and determine if you’re losing body fat and/or muscle.  Again, this weirdly gave me a body fat percentage of 27.8%.  This is not right.
  • Waist to Hip Ratio – Carrying extra weight around your middle, indicated by a high waist to hip ratio, increases health risks associated with obesity.  This tool tells me my Waist to Hip ratio is: 0.93.  Anything over 0.85 signifies a high health risk!
  • Waist to Height Ratio – The waist to height ratio is the best predictor of cardiovascular risk and mortality. My Waist to Height Ratio is 58.3%.  According to the tool, a ratio 54 to 58 means “Seriously Overweight” and a ratio over 58 means “Highly Obese“. That’s not good.
Categories
Exercise Fitness Home Kickboxing sports Travel

Basic Home Kickboxing Workout

OK- It’s been a couple of years since I’ve had a gym that offers kickboxing classes near to me anymore so I thought I would start up again with the very basics. I’ve copied a Fitness Magazine article that includes a 10 minute kickboxing workout [with pictures] into my Guidance and Exercise section.  There is a nice short workout and illustrates how to do each move.

10-Minute Fat-Burning Routine (Do it twice and you’ll burn about 170 calories.)

Minutes: Combination Moves:
0:00–2:00 Jab, cross, hook, uppercut lead with left (30 seconds each)
2:00–4:00 Jab, cross, hook, uppercut lead with right (30 seconds each)
4:00–5:00 Front Kick (30 seconds each, left and right)
5:00–6:00 Roundhouse kick (30 seconds each, left and right)
6:00–7:00 Side kick (30 seconds each, left and right)
7:00–7:30 Combination (left foot forward): Jab (L),  uppercut (R), Front Kick  (L)
7:30–8:00 Combination (right foot forward): Jab (R), uppercut (L),  Front Kick   (R)
8:00–8:30 Combination (left foot forward): Jab  (L), cross (R), Roundhouse kick  (L)
8:30–9:00 Combination (right foot forward):  Jab  (R), cross (L),  Roundhouse kick  (R)

 Kickboxing is great because it:

  • Burns an average of 500 calories an hour (some estimates reach 810)
  • Targets your arms, shoulders, abs, thighs, and butt in one workout
  • It’s an amazing stress release (how often do you get to pretend you’re beating up your archenemy?)

Workout designed by Ilaria Montagnani, creator of Powerstrike kickboxing and a black belt in karate.


Categories
Calories Exercise Fitness Home

Adding a Hula Hoop to My Day

In the interest of trying something new and fun, I have purchased a weighted Hula Hoop.  I spent 10 minutes this morning listening to music and hooping.  It wasn’t bad although I had to learn to keep my elbows out of the way! You supposed to hula hoop in both directions. Mix it up alternating between clockwise and counter-clockwise direction.

Benefits

Hooping is a great ab workout to start with before integrating other exercises into your routine.  Because a hoop workout requires constant push-pull contractions in your core muscles (abs plus obliques, at the sides of your waist) as well as in the glutes and thighs, the added resistance created by a somewhat heavier hoop should sculpt and reshape all the right places.  For what it’s worth there are also many references to unnamed studies stating hooping is an effective way to burn visceral fat  which is deep within the abdominal cavity.  Visceral fat is also linked to metabolic disturbances and shows an increased risk for cardiovascular disease, type 2 diabetes, and many other dangerous health conditions.

Here’s some advice I found on Hula Hooping:

The Mayo Clinic reports that you need to spend at the very least 10 minutes at a timWeighted Hula Hoope exercising your abs with the Hula-Hoop in order to see concrete results. An average woman can burn about 165 calories in 30 minutes of hula hooping, and an average man can burn about 200 calories in 30 minutes of hula hooping.

1.    Stabilize your torso and legs, and mobilize your midsection. Only use your abdominal muscles and hips to keep the hoop spinning.

2.    Scoop your belly in and lift your rib cage. Extend from the center of your body out. The better your posture, the easier it will be to hoop.

3.    Hold the hoop parallel to the floor as you start the spin, and give it some good momentum so it doesn’t start out wobbly.

4.    If your hoop starts to fall, lengthen your spine, push forward and back, and move faster. Imagine yourself as the axis of the orbit, not the orbit itself. If you try to move with the hoop (rotating your hips in a circle) the hoop will lose momentum and fall. Move side to side with your waist and hips or back to front with your belly. Feel the centrifugal force, but don’t try to be the circle; let the circle move around you.

5.    Stick with it. The longer you hoop, the more your body gets used to the movements


Categories
Exercise Fitness Home Travel Weight

New Baseline Test 2015

Time to retest baseline fitness!  (It’s been a crazy couple of years so I did not have high expectations.)  I used the tests outlined on The TopEnd Sports Page.  These are tests that can be done at home with minimal or no equipment. The tests are designed to quickly gauge a person’s general fitness level and to act as a benchmark for future testing. After taking the test, you may wish to train for a few months. Then, take the test again and compare the results.

Although there are six tests, I did only the first three — Push ups, Sit ups and Squats.

  1. Push ups to test upper body strength.
  2. Sit ups to test abdominal or trunk strength.
  3. Squats to measure lower body strength.
  4. Vertical Jump to measure leg explosive power.
  5. Step test to measure aerobic endurance.
  6. Sit & Reach to measure flexibility.

Push Ups:  I did the modified push up with a “bent knee” position. (To do this, kneel on the floor, hands on either side of the chest and keep your back straight. Lower the chest down towards the floor, always to the same level each time, either till your elbows are at right angles or your chest touches the ground.)  I was able to complete 35 push ups vs the 25 expected for my age group. Woo Hoo!

Sit Ups:  You must count the number of sit ups you can do within one minute.  The sit ups required that you (a) squeeze your stomach, (b) push your back flat and (c) raise high enough for your hands to slide along your thighs to touch the tops of your knees. I was able to do 45 sit ups versus the 27 expected for my age group.  Again, I was cooking with gas.

Squats:  The test has you stand in front of a chair or bench with your feet at shoulder’s width apart, facing away from it. Placing your hands on your hips,  you squat down and lightly touch the chair before standing back up. A good sized chair is one that makes your knees at right angles when you are sitting. You keep doing this until you’re fatigued.  I was able to complete 20 squats which is the level appropriate for my age group but I have to admit that I was not lightly touching the chair before standing back up.  My knees were making a racket as well.  I will stay away from squats for the time being.

Listening to old episodes of Fat2Fit radio (still my favorite although they’ve stopped recording), I remembered that I have to do weight training so I get my metabolism at a higher rate.  I think it’s great that I can do some light weight training at home or while traveling with little or no equipment.  Good luck with your training everyone!

Categories
Exercise Fitness Injuries New York

Trying Out Something New

I’ve purchased a Thera-Band Flexbar Hand Exerciser to work on my tennis elbow while traveling.  I’ve been using the red one in physical therapy and have seen improvement in my arm.  The blue colored one is heavier so I hope to build up some strength as well.

Thera-Band Flexbar Hand Exerciser - Tenn•Allows for oscillation movements for neuromuscular and balance trainingis Elbow Relief Bar The Amazon.com description:

  • Allows for oscillation movements for neuromuscular and balance training
  • Provides soft tissue and joint mobilization
  • Used in occupational therapy, physiotherapy, sports and fitness
Categories
Exercise Fitness Home Injuries New York

Exercises for Better Posture

..according to WebMD:

Exercises for Better Posture

Make these posture-boosting exercises a regular part of your workout. Remember to exhale strongly and pull in your core muscles as you work — a key principle in both Pilates and yoga.

1. Core Stabilizer: Single Leg Extension. This exercise trains your core muscles to work together to stabilize your pelvis.

Starting position: Lie on your back with your knees bent, feet flat on the floor, and hands behind your head. Press your low back into the floor, and curl your head up off the floor.
Action: Exhale strongly and pull your navel in and up toward your spine. Slowly pull one knee into your chest, keeping your low back pressed to the floor, while extending your other leg straight at about a 45-degree angle off the floor. Keep your abdominals pulled in and your low back on the floor. If your low back arches off the floor, extend your leg higher toward the ceiling. Switch legs. Start with five to 10 extensions on each side.

Variations to increase intensity: Double-leg extension: Pull both knees into your chest, then extend both legs straight at about a 45-degree angle, using your core to keep your low back on the floor.

As you extend your legs, extend both arms overhead, reaching in the opposite direction from your legs.

2. The New Crunch. The new crunch works the rectus abdominis and obliques. It’s also called a “curl up.”

Starting position: Lie on your back with your knees bent, feet flat on the floor. Press your low back into the floor. Place your hands behind your head, or reach your arms toward your knees if it doesn’t create too much tension in your neck.
Action: Exhale strongly and pull your navel in and up toward your spine. Curl your head and shoulders slowly off the floor. Hold, then slowly lower back down. Repeat until you fatigue.

Variations to increase intensity: Extend one leg straight at a 45-degree angle toward the ceiling.

Hold both legs off the floor, knees bent, with your shins parallel to the floor.

3. Pilates Roll-Ups / Yoga Sit-Ups. These exercises work the rectus abdominis, obliques, and transverse abdominis.

Starting position: Lie on your back with your legs straight, your feet flexed, and your arms reaching overhead on the floor. Press your low back into the floor.
Action: Exhale strongly and pull your navel in and up toward your spine. Roll up in slow motion, reaching your arms off the floor, then your shoulders and head, rolling up one vertebra at a time until you’re sitting up with your abdominals still pulled in. Slowly roll back down. Repeat three to five times, adding more as your core gets stronger.

Variation to increase intensity:  Cross your arms over your chest as you roll up.

4. Crossovers. Crossovers work all the core muscles, focusing on the obliques.

Starting position: Lie on your back with your hands behind your head, your chest lifted off the floor, knees pulled into your chest. Keep your low back pressed into the floor.
Action: Exhale strongly and pull your navel in and up toward your spine. Pull one knee into your chest while extending your other leg straight and rotating your torso toward the bent knee. Slowly switch legs, pulling the other knee into your chest and rotating your torso toward it while extending the opposite leg off the floor. Repeat five to 10 times, adding more as your core gets stronger.

Variation to increase intensity:  The closer your straight leg is to the floor, the harder the work for your core. Try extending your leg just inches off the floor, making sure your lower back stays on the floor.

5. Cobra Pose: Back Extension. The cobra pose strengthens the erector spinae and other low back muscles.

Starting position: Lie on your stomach with palms flat on the floor near your ribs. Extend your legs straight behind you, and press the tops of your feet into the floor.
Action: Exhale strongly and pull your abdominal muscles in and up toward your spine. Lengthen out through your spine and slowly raise your head and chest off the floor, using only your back muscles. Do not push down into your arms to press up. Keep your hip bones on the floor, and gaze down at the floor to relax your neck muscles. Slowly lower back down. Repeat three to five times, adding more as your lower back gets stronger.

Variation to increase intensity: Reach your arms long beside your head. Keep your elbows straight.

6. Plank Pose. This exercise strengthens the obliques and transverse abdominis, as well as your shoulder and back muscles.

Starting position: Start on your hands and knees with your palms under your shoulders. Extend both legs straight behind you, toes tucked under, into a position like the top of a push-up. Pull your abdominal muscles in to prevent a “sway-back,” and gaze down at the floor.

Action: Hold the plank until you’re fatigued. Rest and then repeat. Keep your abdominals pulled in and up so your low back doesn’t sag as you exhale.

Variation to increase intensity:   Forearm plank: Balance on your forearms instead of your hands.


Categories
Exercise Fitness New York

Patella Femoral Syndrome

from: http://www.patellafemoralsyndrome.net/

It looks like I have Patella Femoral Syndrome.  I thought this overview of the problem was pretty good.

Typically patients will complain of localized anterior knee pain which is exacerbated by sports, walking, stair climbing, or sitting for a long time, often called the “Theater Sign” or “Movie-Goers Sign.” The pain from prolonged sitting is thought to occur because of the constant pull of the quadriceps muscle on the knee cap while sitting, which causes its impaction against the hard and unyielding surfaces of the bones of knee joint. Descending stairs may be worse than ascending. Unless there is an underlying pathology in the knee, swelling is usually mild to nil.

Causes

Patella femoral pain syndrome may be caused by overuse, injury, excess weight, a kneecap that is not properly aligned (patellar tracking disorder), or changes under the kneecap.

My physical therapist says my knee cap is not correctly aligned.  I will have to do physical therapy twice a week and have 4 home exercises to do.

Exercises

Straight Leg Raise – Straight leg raising exercises help develop muscles of your lower body, including your hips, glutes and thighs.

Sit on the floor with your injured leg straight and the other leg bent with foot flat on floor. Pull the toes of your injured leg towards you while tightening the muscles on top of your thigh. Raise your leg 6 inches off the floor. Hold for 5 seconds and slowly lower your leg. Repeat this 5 times.

Patella Femoral Syndrome

Band Resisted Clam shell – The band resisted clam shell exercise is great for strengthening and mobilizing the external hip rotators.

side-lying-leg-lifts

Side Leg Lifts – Side leg lifts work the abs, especially the hard to get at obliques, as well as the inner thigh.

Lie on your side with your legs stacked and your head resting on your arm. Tighten the muscle in the front of the top thigh and lift that leg into the air. Hold for one count, lower to touch the bottom leg and then lift again.

Wall Squat with Yoga Block – The quadriceps, or front of thigh, are the targeted muscles during this exercise but many other muscles get a workout also. The butt, hip, calf, back of thigh, low back, abs, and side abs are all used during this move.

Standing, place an exercise ball against a wall and align it in the small of your back. Position your feet a step, to a step and a half in front of your body such that when you squat down your knees will not protrude past your toes. Place a yoga block between your knees and squeeze.   Hold yourself in this position while actively squeezing the block between your thighs.  Maintain the pose as long as you can, allowing yourself to come in and out of the pose when you have to, working your way up to being able to hold the position for 1-2 minutes.


Categories
Fitness Injuries New York

Physical Therapy for My Knee

I went to a chiropractor who told me that I will need to get physical therapy for my knee.  The good news is that she thinks the problem is fixable; the bad news is that I did not hear what the specific problem is.  Time to look into it.