Categories
Exercise sports Travel

Looking Back at Dobbiaco, Italy

Black Diamond Trail Ergo Cork Trekking Pole
2017 dolomite hike
2017 dolomite hike

My husband received new Black Diamond Trail Ergo Cork Trekking Poles for Christmas.

2017-Dolomite-hike Trentino-Alto Adige/South Tyrol

The trekking poles made a huge difference when we hiked in the  Italian Dolomites this past fall, so we thought it would be good for him to have a pair of his own.

2017-Dolomite-landslide

The area has had terrible landslides and the trails were closed in some places.  The mountain hike led us through all types of terrain, or as my husband commented “the Dolomites has complex geomorphology”  Go figure.


Categories
golf sports

Sunny Again in Lanikai

The rain finally gave us a break and everyone is soaking up the sunshine.  I joined the group golf lesson at the Mid Pacific Golf Club and worked on my driving skills.  After an hour, I thought I’d improved.  Sadly, a later round of golf showed that many more hours of practice are needed.

The highlight of the morning?  We saw President Obama on the course.

Categories
New York

Recovering From Hand Surgery

The stitches are out from my finder after hand surgery.  The surgeon had to remove scar tissue and repair the tendon.  So far, my hand looks pretty good.  Oddly, i have two fingers that are swollen and cannot bend instead of just the one.  I will be trying to stretch them out and exercise them while traveling through Ireland over the next couple of weeks.

Until I return to the surgeon for evaluation, I thought I’d look online for some ideas:

Make a Fistwebmd_rf_photo_of_fist_stretch

Make a gentle fist, wrapping your thumb across your fingers.   Stretch only until you feel tightness. You shouldn’t feel pain.Hold for 30 to 60 seconds. Release and spread your fingers wide. Repeat with both hands at least four times.


Claw Stretch

webmd_rf_photo_of_claw_stretchThis stretch helps improve the range of motion in your fingers.

Hold your hand out in front of you, palm facing you.
Bend your fingertips down to touch the base of each finger joint. Your hand should look a little like a claw.
Hold for 30 to 60 seconds and release. Repeat at least four times on each hand.

Finger Bends
Finger bends strengthen your flexor tendons and increase the mobility of tendons across your fingers. To perform this exercise, place your hands palm side up on a bench. Keeping your fingers straight, gently bend your fingers at the knuckles as far as possible.  Hold this position for a few seconds. Bend your wrist and fingers backwards as far as you can. Hold this position for a few seconds and return your hands to the starting position. . Perform 50 repetitions of the exercise each hour you are awake,  Perform this exercise on both hands.

Rubber Band Strengthening
Using a rubber band can strengthen the tendons in the hands post surgery. To perform this exercise, place an elastic band around your thumb and fingers. Keeping your elbow straight, Stretch the elastic band by opening your fingers and thumbs. Hold this position for three seconds. Slowly return your fingers and thumb to the starting position. Perform this exercise until fatigued.

Hand Open and Close
Curl your fihand openngers and thumb making a tight fist then straighten your fingers as far as you can go without pain and provided you feel no more than a mild to moderate stretch


Repeat 10 – 20 times provided the exercise is pain free.

Finger Adduction to Abduction
Begin with your fingers together aFinger Adduction to Abductions demonstrated. Spread your fingers apart as far as you can go without pain and provided you feel no more than a mild to moderate stretch, then return to the starting position.

Repeat 10 – 20 times provided the exercise is pain free.

Categories
New York

Walking in the park before voting

Primary Election Day in New York!  We went for a short walk today on a really lovely spring morning before heading off to the polls.  With the Fitbit app tracking our siblings’ activities, there is an incentive to sneak in a few active minutes where ever we can.

I thought some simple advice about taking care of our knees would be nice.  Here is an article I found by Paul R. on the Healthversations site.

4 Incredibly Important Things You Need to Be Doing for Better Knees

Scientists and doctors agree that there are several key areas to focus on for better joints no matter what your age, and these four can be done all by yourself from the comforts of home.

  • Take a load off. What you may not know and will be shocked to find out is that every extra pound of body weight you carry is equivalent to around 4 pounds of excess pressure on your knees and other joints. That means if you’re just 10 pounds overweight, that’s an extra 40 pounds of unnecessary pressure placed on your joints. Take a load off with regular diet and exercise.
  • Use it or lose it. Although you may limit movement to keep your stiffness and discomfort from flaring up, long periods of inactivity can weaken muscles, which means your joints are doing all the work when you do move. Research suggests that low-impact aerobic exercise can actually help reduce joint tenderness.
  • Don’t forget to stretch! AFTA Certified Personal Trainer, Lisa Amburgey, believes a few minutes of stretching every day will help prevent stiffness or injuries. She recommends the knee extension, performed while sitting on a chair with your back supported and the balls of your feet and toes touching the ground. Slowly extend your right leg in front of you until it is parallel to the floor and your leg is straight out. Flex your foot, hold about 3 seconds, and then slowly return it to the floor. Repeat on your left leg, then alternate legs for 8-12 sets.
  • Supplement for success. What about that sore, aching feeling in your knees and other hot spots that you can’t seem to extinguish no matter what you try? A high-quality joint formula like Instaflex can deliver powerful ingredients and benefits you won’t get elsewhere.


Categories
New York

Physical therapy for my torn meniscus

I’m back to physical therapy for my knee.  There’s been a lot of progress.  Today’s routine was very similar to what i had to do when dealing with my other knee’s Patella Femoral Syndrome and included:

  • On the Pilates Reformer machine:
    • basic one leg pushing exercises
    • bridges
    • leg extensions
  • Using the resistance band:
    • walking side squats
      • How to Do It:Squat-Walk
        Step 1: Attach a resistance band to each ankle.

        Step 2: Stand with your feet a little more than shoulder-width apart. You may need to shorten the band in order to get the right resistance.

        Step 3: Get into a squat position, knees at roughly a 45-degree angle, and walk sideways. Take 5 to 10 steps to the left, then right, keeping your knees bent and maintaining resistance on the band throughout. Repeat. Try keeping your arms outstretched in front of you, which will provide balance as you do the exercise. “Slower and better quality is more important than attempting to do this fast with poor quality,”

    • clam shell exercises
    • side leg raise
      • How to Do It:side legLie on your right side and lift your left leg to 45 degrees in a controlled manner, then lower it back down to the starting position. Make sure your pelvis remains in a neutral position. A more advanced version includes a loop of rubber tubing around your ankles for added resistance. Perform 20-30 reps.
  • back leg lifts, lying down
    • How to Do It:back leg lift
    • Lie face down, head rest­ing on the backs of your hands, elbows out at your sides
    • Gently pull in your lower abs, then squeeze your but­tock muscle tightly on one leg and lift that leg off the ground
    • As you lift, take care not to tip your body over to the other side, as that’s cheat­ing
      Hold your leg briefly in the air, then lower.
    • Now do the same with the other leg.

The knee is getting stronger and the only sharp pains occurred during the walking side squats.  I think it was because my feet were not always in the correct position.

The therapist said the mild burning discomfort in my knee while walking on the beach was normal and caused by the uneven surface.  As long as I don’t overdo it, the knee should improve fairly quickly.  Yes!  Hopefully, I can get to a point where I can do some of the resistance band exercises I had previously tried.

Categories
New York

Fitbit Blaze

I just received a Fitbit Blaze as a present from my husband!  It’s great fun so far although I don’t rack up nearly as many steps as he does.

Fitbit Blaze Smart Fitness Watch, Black, Silver, Large

I decided that i didn’t need the GPS capability built into the watch.  Someday, I will read through the instructions and figure out how to pair it to the GPS in my phone.  There are only rare occasions when I venture out without the phone anyway.

What I needed was:

  • a large screen that was easy to read
  • an accurate heart rate monitor without the need for chest strap, and,
  • something that automatically tracks steps and sleep,

It’s nice that the Fitbit Blaze does all of that without having to remember to manually set something up or change watches or put on a chest strap.

Also nice is the ability to link the calorie and activity tracking from the SparkPeople Mobile App to the Fitbit App.   So I have a constant and visual reminder of how many calories I’ve used and how many I have taken in.  Cool right?  Also having the connection with the Sparkpeople site means that I don’t have to re-enter any of the activity information I’ve been tracking all along.

I think the little badges that you earn for walking are cheesy but cute.  It’s fun to add friends to the Fitbit app so that you have a little community of Type A personalities cheering each other on. 🙂  It’s a terrific incentive.

Anyway, this is my first day and the shiny newness is still with me.

Categories
New York

Torn Meniscus

I’ve been dealing with a torn meniscus since late November.  My poor knee got a tad banged up: I overextended it when my side kick missed the Century B.O.B. (body opponent bag) ; continued to play tennis; and, finally, twisted it on a Christmas hike.  My MRI showed it was a clean break with a Bakers cyst; some arthritis and a sprain.

I basically didn’t do any exercise for a couple of months and babied myself.  We went on a cruise to the Western Caribbean and visited Mexico, Honduras and Belize – very nice.  After returning, I decided against any immediate surgery and opted for physical therapy and a knee brace with struts.  The brace is only necessary when playing tennis or practicing on B.O.B.  I am only punching at this point as kicking seems to just make my knee burn, brace or not.

I’ve been using an iPhone app called Fight Trainer.  It costs $4.99 and it is not perfect but it seems better than some of the others.  I can use it with my wireless headphones and listen to my music.  You can also speed up or slow down the time between instructions.  It keeps you honest when the sun is beating down on you and it seems like you’ve been working out forever.

Sadly, I have some minor surgery coming up to repair a tendon on my right hand so I doubt I will be punching for a while.  On the up side, we will be visiting Ireland in May so i can keep my mind off my troubles.

Categories
New York

Trigger Points and Plantar Fasciitis

I am copying a web page that illustrates how to use trigger points to treat Plantar Fasciitis.  I’ve been trying to exercise consistently (although lightly) but my feet remain problematic.

How I Manage Plantar Fasciitis

By Dee Clement, M Ed, MA
Exercise Physiologist

The plantar fascia is a tough thick band. Its 3 fibrous structures help hold up the arch – from the heel to the ball of the foot. A rich blood supply and high degree of flexibility are essential for proper functioning. A minor tear or pull in the fascia can painfully hamper daily activities. Plantar fasciitis is also known as calcaneal spur syndrome. It can mimic the pain of a stone bruise in the heel.

“If heel pain is felt during the first few steps after sleep – I immediately think of a problem with the plantar fascia”, says Dr William Hamilton, Orthopedic Surgeon for the N Y City Ballet.

Some Common Causes

  • Over training
  • Constant contact with hard or irregular surfaces
  • Structural / biomechanical abnormalities
  • Repeated stress to the foot
  • Improper footwear
  • Obesity

Dr Perry H Julian, foot specialist for the 1996 Olympic games, states, “One of the most common causes of plantar fasciitis is tightness of the calf and achilles tendon.” I agree with Dr. Julian. More importantly muscle tightness is usually traced to trigger points! And, that’s where my approach is focused.

Trigger Points

When the foot becomes fatigued the musculature becomes compromised. Muscle support and locomotion are hampered. An environment ripe for the creation of trigger points is generated. Trigger points are knotty, involuntary contractions of muscle bundles. They prevent the host muscle form relaxing and recovering. Trigger points are painful. The foot contains 126 ligaments, muscles and tendons, so there is plenty of hiding places for trigger points. These aggravating little knots can be found in any muscle. In fact, trigger points in the calf often refer pain directly to the bottom of the foot. Therefore, trigger point therapy of the lower leg and foot is essential in the successful management of plantar fasciitis.

Common Trigger Points of the Foot
Common Trigger Points of the Lower Limb

Leg Management Regimen

I like to start the treatment with the lower leg. I recommend and use a trigger point therapy product called the Intracell Stick. Of the several different models, I prefer the short length with good flexibility. The Intracell Stick compresses and stretches muscle. It simultaneously moves fluids. The Stick performs trigger point therapy and myofascial release – with virtually no effort.

Step 1 – [about 30 seconds]

  • Place the hands close together for better control and easier use of the Intracell Stick.
  • Begin by rolling the muscles outside the shin bone – use short, specific, back-and-forth strokes
  • Roll lengthwise, starting at just below the knee to immediately above the ankle
  • Search for trigger points [ouch pain] and roll with a progressively deeper pressure. When found … roll trigger points an additional 10 – 15 seconds

Step 2 – [about 45 seconds]

  • Follow the same procedure for the calf muscles as you did in step 1
  • The area between the two large muscles of the calf, downward to the heel cord, usually needs special attention
  • I always end the session on the calf with several long back-and-forth rolling strokes

The Foot Regimen

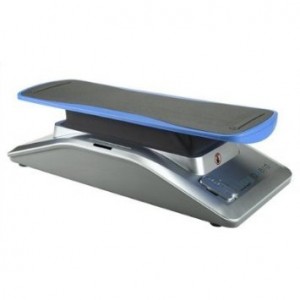
Treatment to the bottom of the foot has always presented a problem for me. In the past I’ve massaged my own feet with coke bottles, frozen cans of juice, golf balls – you name it. Recently I discovered a simple, yet very effective, body tool that absolutely eliminates shortened, tight plantar fascia. It’s called a FootWheel. The FootWheel easily compresses and stretches the complex musculature of the plantar fascia. This process increases circulation and rapidly permits chronically shortened muscles to relax and recover. The 3 treating surfaces of the FootWheel are designed to target the 3 major support muscles of the foot.

Step 3 – [about 45 seconds] Procedure

FootWheel

  • Place the FootWheel on a thick carpet or heavy towel – always stand
  • Support your weight on the opposite side, and begin rolling the bottom of the foot. Use gentle, pleasant pressure
  • Roll the 3 therapeutic wheels to locate and destroy trigger points
  • Trigger points will be recognized as tight, knotty, tender bands of muscle
  • When trigger points are located [ouch pain] – continue rolling for 15 / 20 seconds
  • Move slowly and be gentle. Use specific, short, back-and-forth movements
  • Be sure to tilt and roll the foot – on both the inside and outside – before completing the session.

The foregoing is an amazingly effective procedure to prevent or manage plantar fasciitis. It takes about 3 minutes. Use the techniques at least twice per day – namely before and after a night’s sleep. Use more often if needed. Keep the sessions short and gentle to avoid soreness. Progress is gauged by the way you feel and the number of trigger points you extinguish. Healthy, happy feet are free to tenderness, soreness & pain … even during rollouts.

Good luck and keep on rolling!

REMEMBER, this is an article based on the empirical findings of the author. The suggestions, procedures and ideas are not intended to replace or substitute the medical advice of the readers’ healthcare provider. Please consult your personal healthcare practitioner before adopting any of the suggestions.
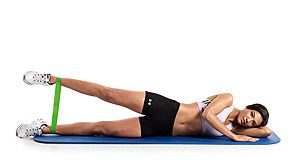
 

Categories
New York

Simple Weight Exercises Using the iJoy Board

Human Touch iJoy Exercise Board - Blue/ Black
Human Touch iJoy Exercise Board – Blue/ Black

I haven’t made much use of my iJoy Board in a long while.  You maintain your balance on the board while it moves at various speeds.  This is the only device where you have to react to what is happening with no forewarning.

I decided to dust off my iJoy board and do bicep curls, modified triceps kickbacks and lateral raises while the board was going full speed.  It probably wasn’t a wise or safe thing to do but it was a lot of fun. 🙂

So far, my body fat percentage has decreased 1.5% although my weight is down only 8 pounds.  I guess that’s a good sign.

Categories
New York

Improving Your Kicking Technique

I’m trying to find the exercises my trainer had me do to practice proper kicking technique.  I found the following instructions on various sites.

The key to the exercise is to break the kick down into its component parts and to practice it slowly.

  1. First raise your knee, hold it
  2. extend the leg, hold it,
  3. lower the leg but keep your knee up, hold it,
  4. lower your leg back to where you started.

These positions should all be held for several seconds each (holding them longer can help build tendon strength). You can practice all your kicks using this method.

The Sanda Sidekick:

Breaking the kick down into its component parts helps you master the mechanics of it, and helps to prevent sloppy technique.  It makes the difference between what is little more than a quick sideways leg raise instead of a good high sidekick. 

Focus just beyond the edge of your foot (which should be through the other side of the target). While focus is paramount, you’ll need to strengthen tight/weak muscles. If you cannot kick at a height that satisfies you, then back off a little and perfect your kick at a lower level, then gradually work your way up in height.

Here’s a step by step description of the Sanda sidekick (all of it is excellently illustrated in the video that follows):

Before throwing the kick:  Stand in your proper fighting stance with your target in front of you.

  • Step One
    • Lift your lead leg upwards, slightly past center-line as if you are checking a low kick coming from the opposite side.
    • Do not turn your body sideways as you initially lift your leg. This is unnecessary movement and will telegraph the kick.
    • Bend your ankle so that you can land the strike with your heel – not the sole or the blade of the foot.
    • To get extra range on your sidekick, shuffle your planted foot forward as you throw the kick. Make sure the planted foot drives down when the kick lands.
      To get extra range on your sidekick, shuffle your planted foot forward as you throw the kick. Make sure the planted foot drives down when the kick lands.
  • Step Two
    • Chamber your kicking leg higher so that your shin is parallel to the ground.
    • Simultaneously turn your body sideways.
    • Turn the foot of your supporting leg so that your heel is pointing towards your opponent.
  • Step Three
    • Kick straight out, thrusting with the power of your hips as well as with both your legs.
    • As the kick lands, push into the ground with the ball of your panted foot. This will drive the force of your kick from the target into the ground.
    • Your leg muscles should only be tensed when your kick is fully extended.
    • The heel of your planted foot should be pointing in the same direction of the kick.
    • Don’t lean your body weight away from the target. You want your entire momentum to be driven forward into your opponent.
    • To add extra distance and power, shuffle your supporting foot towards the target as the kick is being delivered. Do this by propelling your entire body weight forward with the momentum of your kick. Land your shuffling foot at the same time the kick hits the target.
  • Step Four
    • Re-chamber your leg towards your chest. Your shin should be parallel to the ground as it is being retracted.
    • Don’t drop your leg directly to the ground after kicking. Always re-chamber your leg as you will be vulnerable to counter-striking and kick catch techniques. This is especially important in MMA, since it will be easy for your opponent to catch your kick and take you down.
    • It’s also important to keep your heel pointed at the target as you retract your kick so that you are in position to fire another quick kick in case your opponent tries to close the distance for a take-down.
  • Step Five
    • Place your kicking leg back on the ground as you square up to your fighting stance and re-establish your guard.

Watch this video!  Jason Yee, the instructor, is terrific.

(Jason Yee demonstrates techniques for the Sanda Sidekick as well as a few exercises to build strength in order to perform the maneuver.) The Sanda Sidekick – KungFuMagazine.com