Categories
Calories Fitness Home New York Tools Weight

Using The Tools on This Site

I wanted to revisit all the Fitness tools and Calculators included on this site.  I had mixed results but the bottom line is that my tummy must be trimmed down. Stepping through the main page, we have the:

  • Body Fat Calculator  from http://www.fat2fitradio.com/tools/bf/  The formula provided will not calculate your exact body fat percentage but should give you a consistent measurement you can use as a guideline and determine if you’re losing body fat and/or muscle. Oddly, the calculation says I have body fat percentage is 27.4%.  My scale tells me it is 39%. I think I’m measuring something incorrectly.

    From http://www.fat2fitradio.com/
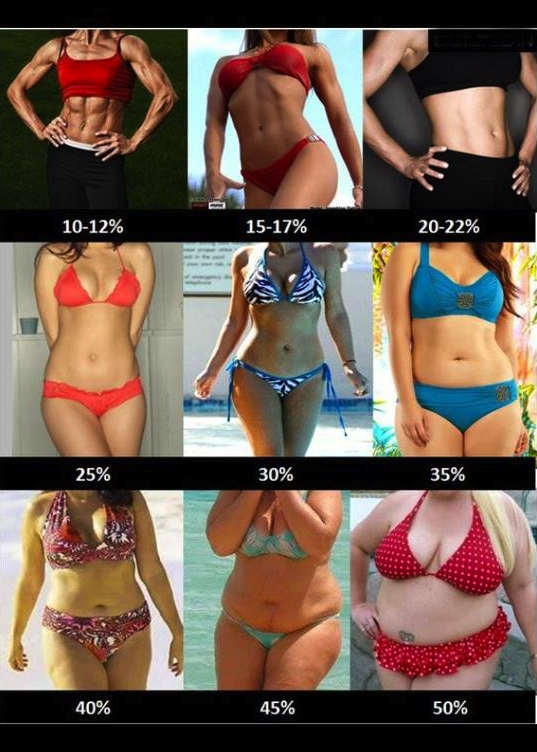
    Fat 2 Fit #144 – New Measurements Of Success Written on March 3, 2013 – 12:00 am | by Helana Brigman

Looking at this photo, I’m sadly inclined to believe my scale.

  •  How much should you weigh?  Inputting 39% body fat into the Fat 2 Fit Tool, the ideal weight for my age with 35% body fat is 168 pounds.  That seems doable.
  • Calories and Basal Metabolic Rate (BMR) –  Fat 2 Fit Tools advocates eating like the thin, healthy person that you want to become. The calorie levels in the chart are not extreme, but  create that all important caloric deficit that is required to get you to your goal weight in a safe manner.  Based on my goal weight of 168 and assuming light exercise/sports 1-3 days/week,  the tool suggests a daily caloric intake of 2005! As I get closer to my goal weight, my weight loss will start to slow down. It is OK to eat a few hundred calories less per day (200-300) to speed up your weight loss at this point.
  • Covert Bailey Body Fat Calculation – The formulas in this body fat calculation are based on the Covert Bailey book The Ultimate Fit or Fat. The formula does not calculate your exact body fat percentage but should give you a consistent measurement you can use as a guideline and determine if you’re losing body fat and/or muscle.  Again, this weirdly gave me a body fat percentage of 27.8%.  This is not right.
  • Waist to Hip Ratio – Carrying extra weight around your middle, indicated by a high waist to hip ratio, increases health risks associated with obesity.  This tool tells me my Waist to Hip ratio is: 0.93.  Anything over 0.85 signifies a high health risk!
  • Waist to Height Ratio – The waist to height ratio is the best predictor of cardiovascular risk and mortality. My Waist to Height Ratio is 58.3%.  According to the tool, a ratio 54 to 58 means “Seriously Overweight” and a ratio over 58 means “Highly Obese“. That’s not good.
Categories
Exercise Fitness Home Kickboxing sports Travel

Basic Home Kickboxing Workout

OK- It’s been a couple of years since I’ve had a gym that offers kickboxing classes near to me anymore so I thought I would start up again with the very basics. I’ve copied a Fitness Magazine article that includes a 10 minute kickboxing workout [with pictures] into my Guidance and Exercise section.  There is a nice short workout and illustrates how to do each move.

10-Minute Fat-Burning Routine (Do it twice and you’ll burn about 170 calories.)

Minutes: Combination Moves:
0:00–2:00 Jab, cross, hook, uppercut lead with left (30 seconds each)
2:00–4:00 Jab, cross, hook, uppercut lead with right (30 seconds each)
4:00–5:00 Front Kick (30 seconds each, left and right)
5:00–6:00 Roundhouse kick (30 seconds each, left and right)
6:00–7:00 Side kick (30 seconds each, left and right)
7:00–7:30 Combination (left foot forward): Jab (L),  uppercut (R), Front Kick  (L)
7:30–8:00 Combination (right foot forward): Jab (R), uppercut (L),  Front Kick   (R)
8:00–8:30 Combination (left foot forward): Jab  (L), cross (R), Roundhouse kick  (L)
8:30–9:00 Combination (right foot forward):  Jab  (R), cross (L),  Roundhouse kick  (R)

 Kickboxing is great because it:

  • Burns an average of 500 calories an hour (some estimates reach 810)
  • Targets your arms, shoulders, abs, thighs, and butt in one workout
  • It’s an amazing stress release (how often do you get to pretend you’re beating up your archenemy?)

Workout designed by Ilaria Montagnani, creator of Powerstrike kickboxing and a black belt in karate.


Categories
Calories Exercise Fitness Home

Adding a Hula Hoop to My Day

In the interest of trying something new and fun, I have purchased a weighted Hula Hoop.  I spent 10 minutes this morning listening to music and hooping.  It wasn’t bad although I had to learn to keep my elbows out of the way! You supposed to hula hoop in both directions. Mix it up alternating between clockwise and counter-clockwise direction.

Benefits

Hooping is a great ab workout to start with before integrating other exercises into your routine.  Because a hoop workout requires constant push-pull contractions in your core muscles (abs plus obliques, at the sides of your waist) as well as in the glutes and thighs, the added resistance created by a somewhat heavier hoop should sculpt and reshape all the right places.  For what it’s worth there are also many references to unnamed studies stating hooping is an effective way to burn visceral fat  which is deep within the abdominal cavity.  Visceral fat is also linked to metabolic disturbances and shows an increased risk for cardiovascular disease, type 2 diabetes, and many other dangerous health conditions.

Here’s some advice I found on Hula Hooping:

The Mayo Clinic reports that you need to spend at the very least 10 minutes at a timWeighted Hula Hoope exercising your abs with the Hula-Hoop in order to see concrete results. An average woman can burn about 165 calories in 30 minutes of hula hooping, and an average man can burn about 200 calories in 30 minutes of hula hooping.

1.    Stabilize your torso and legs, and mobilize your midsection. Only use your abdominal muscles and hips to keep the hoop spinning.

2.    Scoop your belly in and lift your rib cage. Extend from the center of your body out. The better your posture, the easier it will be to hoop.

3.    Hold the hoop parallel to the floor as you start the spin, and give it some good momentum so it doesn’t start out wobbly.

4.    If your hoop starts to fall, lengthen your spine, push forward and back, and move faster. Imagine yourself as the axis of the orbit, not the orbit itself. If you try to move with the hoop (rotating your hips in a circle) the hoop will lose momentum and fall. Move side to side with your waist and hips or back to front with your belly. Feel the centrifugal force, but don’t try to be the circle; let the circle move around you.

5.    Stick with it. The longer you hoop, the more your body gets used to the movements


Categories
Exercise Fitness Home Travel Weight

New Baseline Test 2015

Time to retest baseline fitness!  (It’s been a crazy couple of years so I did not have high expectations.)  I used the tests outlined on The TopEnd Sports Page.  These are tests that can be done at home with minimal or no equipment. The tests are designed to quickly gauge a person’s general fitness level and to act as a benchmark for future testing. After taking the test, you may wish to train for a few months. Then, take the test again and compare the results.

Although there are six tests, I did only the first three — Push ups, Sit ups and Squats.

  1. Push ups to test upper body strength.
  2. Sit ups to test abdominal or trunk strength.
  3. Squats to measure lower body strength.
  4. Vertical Jump to measure leg explosive power.
  5. Step test to measure aerobic endurance.
  6. Sit & Reach to measure flexibility.

Push Ups:  I did the modified push up with a “bent knee” position. (To do this, kneel on the floor, hands on either side of the chest and keep your back straight. Lower the chest down towards the floor, always to the same level each time, either till your elbows are at right angles or your chest touches the ground.)  I was able to complete 35 push ups vs the 25 expected for my age group. Woo Hoo!

Sit Ups:  You must count the number of sit ups you can do within one minute.  The sit ups required that you (a) squeeze your stomach, (b) push your back flat and (c) raise high enough for your hands to slide along your thighs to touch the tops of your knees. I was able to do 45 sit ups versus the 27 expected for my age group.  Again, I was cooking with gas.

Squats:  The test has you stand in front of a chair or bench with your feet at shoulder’s width apart, facing away from it. Placing your hands on your hips,  you squat down and lightly touch the chair before standing back up. A good sized chair is one that makes your knees at right angles when you are sitting. You keep doing this until you’re fatigued.  I was able to complete 20 squats which is the level appropriate for my age group but I have to admit that I was not lightly touching the chair before standing back up.  My knees were making a racket as well.  I will stay away from squats for the time being.

Listening to old episodes of Fat2Fit radio (still my favorite although they’ve stopped recording), I remembered that I have to do weight training so I get my metabolism at a higher rate.  I think it’s great that I can do some light weight training at home or while traveling with little or no equipment.  Good luck with your training everyone!

Categories
Exercise Hawaii Home Injuries

Fixing my Feet

Along the way, my Plantar Fasciitis seems to have flared up again.  Plantar fasciitis is caused because the tough, fibrous band of tissue (fascia) connecting the heel bone to the base of the toes has become inflamed.  Overweight women, like myself, are more likely to develop the condition.  Walking a lot on hard surfaces makes it worse, so our long walks into town were making it worse.  The pain classically occurs right after getting up in the morning and after a period of sitting. The excruciating pain in my heel bone was often felt worse after (not during) exercise.

According to my research, stretching is the best treatment for plantar fasciitis.  I found this exercise to be the most helpful:

  • Plantar fascia stretch: Stand with the ball of your injured foot on a stair. Reach for the bottom step with your heel >until you feel a stretch in the arch of your foot. Hold this position for 15 to 30 seconds and then relax. Repeat 3 times. After you have stretched the bottom muscles of your foot, you can begin strengthening the top muscles of your foot.

FootCareMD suggests the following

  • Lean forward against a wall with one knee straight and heel on the ground. Your other knee is bent. Your heel cord and foot arch stretch as you lean. Hold for 10 seconds, relax and straighten up. Repeat 20 times for each sore heel. It is important to keep the knee fully extended on the side being stretched.
  • Lean forward onto a countertop, spreading your feet apart with one foot in front of the other. Flex your knees and squat down, keeping your heels on the ground as long as possible. Your heel cords and foot arches will stretch as the heels come up in the stretch. Hold for 10 seconds, relax and straighten up. Repeat 20 times.
  • Plantar Fascia-Specific Stretching Program
    From American Orthopaedic Foot & Ankle Society (AOFAS) http://www.aofas.org/footcaremd/Pages/footcaremd.aspx
      1. Cross your affected leg over your other leg.
      2. Using the hand on your affected side, take hold of your affected foot and pull your toes back towards shin. This creates tension/stretch in the arch of the foot/plantar fascia.
      3. Check for the appropriate stretch position by gently rubbing the thumb of your unaffected side left to right over the arch of the affected foot. The plantar fascia should feel firm, like a guitar string.
      4. Hold the stretch for a count of 10. A set is 10 repetitions.

The good news is that my foot feels so much better!  We have even begun playing tennis in the mornings.

Here is a great list of exercises that you can follow. Plantar Fascitis Exercises-1.  Stick to it if you have problems with foot pain, plantar fasciitis, and or heel pain.

I also use the Active Ankle Dns Dorsal Night Splint Active Ankle Dns Dorsal Night Splint when I go to bed.  It’s been very helpful too.