I found this link while trolling for videos that would help me improve my sidekick. It’s been a long time since I’ve practiced. This video has a tip that teaches you how to ensure your sidekick travels in a straight line. The guy in the video seems a little nerdy but his review of proper form and suggestions to improve your sidekick are terrific. Enjoy!
Category: New York
Categories
Goal Setting
I’ve read all sorts of articles saying that the most sensible way to lose weight is to lose 1-2 pounds per week. This translates into making only minor adjustments to how and what you eat. That’s important because just the thought of “dieting” makes me hungry and depressed. The second part of the advice is to maintain or increase weight/resistance training so that you don’t lose muscle while you’re losing weight; you should try to reduce body fat only.
My idea is to cut down on calories but not so much that my body thinks it is starving and I end up as a yo-yo dieter. Over the past few weeks, we’ve been eating more fruits and vegetables and reducing the number of snacks. We’ve also been hiking, playing tennis and swimming. My husband’s lost over 20 pounds! I haven’t done as well although I am ahead of my 1 pound a week goal. Happily, I am also down one dress size.
Under the Tools and Calculator tab, is a section called How much should you weigh? The link brings you to the Fat2FitRadio.com site. They have a goal body weight calculator that uses your body fat percentage and your lean body mass to gauge how much you should weigh.
The Fat2FitRadio.com site has a Calories and Basal Metabolic Rate (BMR) Calculator. This calculator establishes the baseline number of calories you should eat on a daily basis AND the number of calories that you should start eating today and for the rest of your life (http://www.fat2fitradio.com/tools/bmr/). It is astonishing how many much calories they suggest you eat versus almost everyone else (including Sparkpeople.com).
BMR is the minimum number of calories your body needs to consume so that it works correctly; you also need calories/energy so that your body can perform basic activities.
Here are some basic weight exercises you can do while watching TV:
- Biceps – alternating bicep curl. A bicep curl is the standard bicep workout done with hand weights. Doing an alternated curl means you switch back and forth between your arms so that you get an even workout.
- Stand with your feet apart and flat on the ground. Hold a dumbbell in each hand and let each hand hang down at your side with your palms facing in towards each other.
- Raise your right dumbbell so that it reaches shoulder height by curling your forearm up towards your chest. The underside of your forearm should face up towards the sky.
- While lowering the right dumbbell, begin to lift the left one up in the same manner. Avoid jerking your body backwards to help you lift the dumbbells. If you are doing this, your dumbbells are too heavy.
- Biceps – hammer grab.
- Grab a dumbbell in each of your hands so that your palms face in towards your body. Hold your arms down by your sides.
- Curl your arms and lift the dumbbells so that the tops of the dumbbells comes toward your shoulders. The inner side of your forearm should be facing side.
- Triceps – two-arm tricep extension. This workout only uses one dumbbell. You can do this while standing or sitting.
- Grasp one dumbbell with both of your hands and hold it behind your head. Your arms should be bent into right angles with your forearms running along the sides of your head so that the dumbbell is in the back of your head.
- Extend your elbows and lift your forearms so that they are pointed vertically above your head with the dumbbell. Hold that position for a moment and then lower them back to the right angle position behind your head.
- Triceps – triceps kickback. Place your left knee and left hand on to the flat surface of either the bed or bench. Your right leg should be straight against the side of the bed or bench.
- Hold a dumbbell with your right hand. Your upper arm should be running parallel to your body and your palm should be facing your body.
- Extend your elbow so that the dumbbell lifts up towards your back. Hold the dumbbell up for a moment and then release it back down.
- Switch so that your right knee and right hand are on the bed and extend your left tricep.
- Shoulders – palms-in shoulder press.
- Stand up, holding dumbbells in both hands. Hold the dumbbells at shoulder level. Your palms should be facing each other.
- Extend your elbows until the come close to locking. The dumbbells should get raised straight into the air–hold them in this position for a moment.
- Slowly lower your arms so that the dumbbells are back at shoulder level.
- Shoulders – lateral raise. You can also do these while sitting but instead of holding the dumbbells in front of you, hold them down by your sides.
- Hold a dumbbell in each hand and hold your hands in front of your hips. Your palms should be facing each other.
- Lift your arms out to your sides until they are almost parallel with the ground. Hold them in this position for a moment and then release them back down to your hips.
- Back – wide row exercise. For this exercise, keep in mind that you should breathe out when lifting the dumbbells up, and breathe in when releasing them back into resting position.
- Get into a squatting position by flexing your hips and knees. Hold one dumbbell in each hand so that your palms are facing your body. The dumbbells should start just below your knees.
- Lift the dumbbells straight up so that your arms form right angles. You should not alter how your knees and hips are bent.
- Hold the dumbbells up for a moment and then let them slowly drop back down into resting position.
Categories
Fighting a Fatty Liver
A couple of years ago my doctor asked me how much alcohol I was drinking because my blood test came back with abnormal results. I don’t drink very much or very often so i was surprised by the question. It turns out that the most common disease in America is called NALFD (non-alcoholic fatty liver disease) or fatty liver, for short, and is a major risk factor for diabetes, heart attacks, and even cancer. It can progress to Non Alcoholic Steatohepatis (NASH), which causes liver inflammation and can lead to cirrhosis or liver cancer in about 10% of those affected.
Fat and the liver: Though the exact effect of excess fat on the liver isn’t well understood, it appears to create problems on a spectrum. At the low and least harmful end, the liver may be able to perform its many functions even while it contains too much fat. However, once inflammation and swelling occur in the organ, scarring can result as the liver tries to heal itself. This is a hallmark symptom of liver injury in advanced non-alcoholic fatty liver disease: collagen is laid down, and fibrosis or thickening of the liver tissue ensues. As the disease progresses, about 10% of cases will develop over the next ten years into the much more serious NASH, or non-alcoholic steatohepatitis. NASH can lead to cirrhosis or hardening of the liver, liver failure, liver cancer, and death.
What causes it? The high fructose corn syrup found in our processed foods is the single biggest cause of fatty liver. Soda, which, frighteningly, is the number one source of calories in the American diet, is the biggest cause of fatty liver.
Who gets non-alcoholic fatty liver disease? Though the exact causes of NAFLD are not known, most of the people who develop it are obese, have type 2 diabetes or have metabolic syndrome, which is associated with insulin resistance. What’s more, the severity of NAFLD increases with the degree of obesity, and abdominal or belly fat seems to increase the risk of dangerous NASH, even in patients with a body mass index (BMI) in a normal range.
Genetic factors influence each individual component of the syndrome, and the syndrome itself. A family history that includes type 2 diabetes, hypertension, and early heart disease greatly increases the chance that an individual will develop the metabolic syndrome.
Environmental issues such as low activity level, sedentary lifestyle, and progressive weight gain also contribute significantly to the risk of developing the metabolic syndrome.
Metabolic syndrome is present in about 5% of people with normal body weight, 22% of those who are overweight and 60% of those considered obese. Adults who continue to gain five or more pounds per year raise their risk of developing metabolic syndrome by up to 45%.
While obesity itself is likely the greatest risk factor, others factors of concern include:
- Women who are post-menopausal
- Smoking
- Eating an excessively high carbohydrate diet
- Lack of activity (even without weight change)
How do you know if you have it?
There are blood tests available that can detect a fatty liver. You can also see it on an ultrasound. And if your test comes back abnormal, you are in trouble. But even if your test comes back normal, you might not be out of the woods. It’s important to know that a liver function test doesn’t always detect a fatty liver. An ultrasound can be more sensitive.
The bottom line is, if you eat a lot of sugar and flour, if you have a little bit of belly fat, or if you crave carbs, starch, and sugar, you probably have this.
How to fix your fatty liver
The most promising treatments for NAFLD are weight loss (including bariatric surgery) and exercise. There are some really simple things you can do:
- Cut out all high fructose corn syrup from your diet. If you see it on any label for any product—whether it’s a salad dressing or ketchup or tomato sauce—don’t eat it.
- Reduce or eliminate starch. Get rid of white, processed flour. Even whole grain flours can be a problem.
- Add some good things to your diet to help heal your fatty liver. Add plenty of fruit, vegetables, nuts, and seeds. Add lean animal protein like chicken and fish. Add good oils like olive oil, macadamia nut oil, avocados, coconut butter, and fish oil. Good fats like these are anti-inflammatory, and they help repair your liver.
- Improve your metabolism through exercise. This is a fabulous way to improve insulin resistance and reduce fatty liver.
- Supplements: Polyunsaturated Fatty Acids (PUFA’s), can be helpful. Omega 3 fish oils have been shown to reduce fatty infiltration on ultrasound, and they’re also anti-inflammatory and reduce insulin resistance. A recent study used Cinnamon (1500mg) to treat NALFD and found that liver enzymes improved (as well as blood sugar, lipids and inflammation markers).
More information:
- Fatty Liver – (Nonalcoholic Fatty Liver Disease [NAFLD] and Nonalcoholic Steatohepatitis [NASH])
- Non-Alcoholic Fatty Liver Disease – What Obesity, Diabetes and Other Conditions Can Do To Your Liver
- Silent Liver Disease May Effect 30% Of Americans
- Do You Have a Fatty Liver? 90 Million Americans Do!
On a lighter note (pun intended) I really like doing the online Body Age quizzes. A thorough one (which incidentally gave me a happy analysis) can be found at: http://www.biological-age.com.
I wanted to revisit all the Fitness tools and Calculators included on this site. I had mixed results but the bottom line is that my tummy must be trimmed down. Stepping through the main page, we have the:
- Body Fat Calculator from http://www.fat2fitradio.com/tools/bf/ The formula provided will not calculate your exact body fat percentage but should give you a consistent measurement you can use as a guideline and determine if you’re losing body fat and/or muscle. Oddly, the calculation says I have body fat percentage is 27.4%. My scale tells me it is 39%. I think I’m measuring something incorrectly.
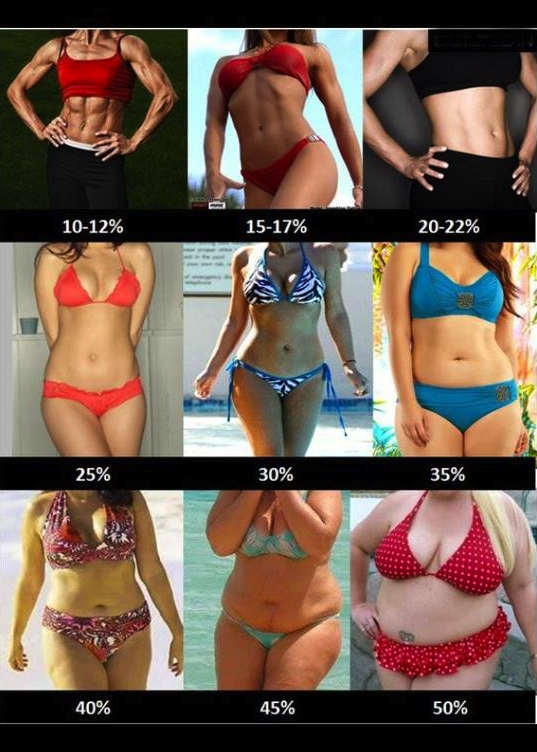
Fat 2 Fit #144 – New Measurements Of Success Written on March 3, 2013 – 12:00 am | by Helana Brigman
Looking at this photo, I’m sadly inclined to believe my scale.
- How much should you weigh? Inputting 39% body fat into the Fat 2 Fit Tool, the ideal weight for my age with 35% body fat is 168 pounds. That seems doable.
- Calories and Basal Metabolic Rate (BMR) – Fat 2 Fit Tools advocates eating like the thin, healthy person that you want to become. The calorie levels in the chart are not extreme, but create that all important caloric deficit that is required to get you to your goal weight in a safe manner. Based on my goal weight of 168 and assuming light exercise/sports 1-3 days/week, the tool suggests a daily caloric intake of 2005! As I get closer to my goal weight, my weight loss will start to slow down. It is OK to eat a few hundred calories less per day (200-300) to speed up your weight loss at this point.
- Covert Bailey Body Fat Calculation – The formulas in this body fat calculation are based on the Covert Bailey book The Ultimate Fit or Fat.
The formula does not calculate your exact body fat percentage but should give you a consistent measurement you can use as a guideline and determine if you’re losing body fat and/or muscle. Again, this weirdly gave me a body fat percentage of 27.8%. This is not right.
- Waist to Hip Ratio – Carrying extra weight around your middle, indicated by a high waist to hip ratio, increases health risks associated with obesity. This tool tells me my Waist to Hip ratio is: 0.93. Anything over 0.85 signifies a high health risk!
- Waist to Height Ratio – The waist to height ratio is the best predictor of cardiovascular risk and mortality. My Waist to Height Ratio is 58.3%. According to the tool, a ratio 54 to 58 means “Seriously Overweight” and a ratio over 58 means “Highly Obese“. That’s not good.
I’ve purchased a Thera-Band Flexbar Hand Exerciser to work on my tennis elbow while traveling. I’ve been using the red one in physical therapy and have seen improvement in my arm. The blue colored one is heavier so I hope to build up some strength as well.
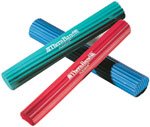 The Amazon.com description:
- Allows for oscillation movements for neuromuscular and balance training
- Provides soft tissue and joint mobilization
- Used in occupational therapy, physiotherapy, sports and fitness
Categories
Back From the Black Sea

We are back from our Black Sea Cruise- the weather was great. While we lost the Halloween Costume Contest to a very deserving couple, the trip was fun. I tried to eat sensibly at breakfast and lunch was generally reasonable because we ate lunch while out on tours. Dinner was always very good and bountiful– I gained a couple of pounds that I hope to lose before Thanksgiving.
My brief walking stints around the deck hurt my left arm because of the Lateral Elbow Tendinosis. My therapist had recommended I get a wrist brace but I hadn’t a chance to pick one up before we left. I guess I should make some time.
Categories
Heading Out to the Black Sea
October 2013 – Next week, we will head off on a trip to Greece, Ukraine, Romania,  Bulgaria, Turkey, Slovenia and Italy. It should be a great trip – 14 days door-to-door! We will be celebrating Halloween while on ship. I’ve a great Victorian corset skirt and black velvet riding jacket. I’m finishing the ensemble with some lovely vampire teeth that my dentist customized for me. They look beautiful; it’s a shame I cannot eat with them attached. Luckily, they are easy to remove.
..according to WebMD:
Exercises for Better Posture
Make these posture-boosting exercises a regular part of your workout. Remember to exhale strongly and pull in your core muscles as you work — a key principle in both Pilates and yoga.
1. Core Stabilizer: Single Leg Extension. This exercise trains your core muscles to work together to stabilize your pelvis.
Starting position: Lie on your back with your knees bent, feet flat on the floor, and hands behind your head. Press your low back into the floor, and curl your head up off the floor.
Action: Exhale strongly and pull your navel in and up toward your spine. Slowly pull one knee into your chest, keeping your low back pressed to the floor, while extending your other leg straight at about a 45-degree angle off the floor. Keep your abdominals pulled in and your low back on the floor. If your low back arches off the floor, extend your leg higher toward the ceiling. Switch legs. Start with five to 10 extensions on each side.
Variations to increase intensity: Double-leg extension: Pull both knees into your chest, then extend both legs straight at about a 45-degree angle, using your core to keep your low back on the floor.
As you extend your legs, extend both arms overhead, reaching in the opposite direction from your legs.
2. The New Crunch. The new crunch works the rectus abdominis and obliques. It’s also called a “curl up.”
Starting position: Lie on your back with your knees bent, feet flat on the floor. Press your low back into the floor. Place your hands behind your head, or reach your arms toward your knees if it doesn’t create too much tension in your neck.
Action: Exhale strongly and pull your navel in and up toward your spine. Curl your head and shoulders slowly off the floor. Hold, then slowly lower back down. Repeat until you fatigue.
Variations to increase intensity: Extend one leg straight at a 45-degree angle toward the ceiling.
Hold both legs off the floor, knees bent, with your shins parallel to the floor.
3. Pilates Roll-Ups / Yoga Sit-Ups. These exercises work the rectus abdominis, obliques, and transverse abdominis.
Starting position: Lie on your back with your legs straight, your feet flexed, and your arms reaching overhead on the floor. Press your low back into the floor.
Action: Exhale strongly and pull your navel in and up toward your spine. Roll up in slow motion, reaching your arms off the floor, then your shoulders and head, rolling up one vertebra at a time until you’re sitting up with your abdominals still pulled in. Slowly roll back down. Repeat three to five times, adding more as your core gets stronger.
Variation to increase intensity: Cross your arms over your chest as you roll up.
4. Crossovers. Crossovers work all the core muscles, focusing on the obliques.
Starting position: Lie on your back with your hands behind your head, your chest lifted off the floor, knees pulled into your chest. Keep your low back pressed into the floor.
Action: Exhale strongly and pull your navel in and up toward your spine. Pull one knee into your chest while extending your other leg straight and rotating your torso toward the bent knee. Slowly switch legs, pulling the other knee into your chest and rotating your torso toward it while extending the opposite leg off the floor. Repeat five to 10 times, adding more as your core gets stronger.
Variation to increase intensity: The closer your straight leg is to the floor, the harder the work for your core. Try extending your leg just inches off the floor, making sure your lower back stays on the floor.
5. Cobra Pose: Back Extension. The cobra pose strengthens the erector spinae and other low back muscles.
Starting position: Lie on your stomach with palms flat on the floor near your ribs. Extend your legs straight behind you, and press the tops of your feet into the floor.
Action: Exhale strongly and pull your abdominal muscles in and up toward your spine. Lengthen out through your spine and slowly raise your head and chest off the floor, using only your back muscles. Do not push down into your arms to press up. Keep your hip bones on the floor, and gaze down at the floor to relax your neck muscles. Slowly lower back down. Repeat three to five times, adding more as your lower back gets stronger.
Variation to increase intensity: Reach your arms long beside your head. Keep your elbows straight.
6. Plank Pose. This exercise strengthens the obliques and transverse abdominis, as well as your shoulder and back muscles.
Starting position: Start on your hands and knees with your palms under your shoulders. Extend both legs straight behind you, toes tucked under, into a position like the top of a push-up. Pull your abdominal muscles in to prevent a “sway-back,” and gaze down at the floor.
Action: Hold the plank until you’re fatigued. Rest and then repeat. Keep your abdominals pulled in and up so your low back doesn’t sag as you exhale.
Variation to increase intensity: Forearm plank: Balance on your forearms instead of your hands.

It looks like I have Patella Femoral Syndrome. I thought this overview of the problem was pretty good.
Typically patients will complain of localized anterior knee pain which is exacerbated by sports, walking, stair climbing, or sitting for a long time, often called the “Theater Sign” or “Movie-Goers Sign.” The pain from prolonged sitting is thought to occur because of the constant pull of the quadriceps muscle on the knee cap while sitting, which causes its impaction against the hard and unyielding surfaces of the bones of knee joint. Descending stairs may be worse than ascending. Unless there is an underlying pathology in the knee, swelling is usually mild to nil.
Causes
Patella femoral pain syndrome may be caused by overuse, injury, excess weight, a kneecap that is not properly aligned (patellar tracking disorder), or changes under the kneecap.
My physical therapist says my knee cap is not correctly aligned. I will have to do physical therapy twice a week and have 4 home exercises to do.
Exercises
Straight Leg Raise – Straight leg raising exercises help develop muscles of your lower body, including your hips, glutes and thighs.
Sit on the floor with your injured leg straight and the other leg bent with foot flat on floor. Pull the toes of your injured leg towards you while tightening the muscles on top of your thigh. Raise your leg 6 inches off the floor. Hold for 5 seconds and slowly lower your leg. Repeat this 5 times.

Band Resisted Clam shell – The band resisted clam shell exercise is great for strengthening and mobilizing the external hip rotators.
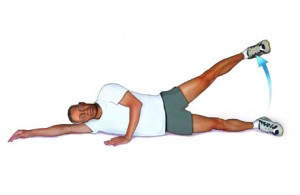
Side Leg Lifts – Side leg lifts work the abs, especially the hard to get at obliques, as well as the inner thigh.
Lie on your side with your legs stacked and your head resting on your arm. Tighten the muscle in the front of the top thigh and lift that leg into the air. Hold for one count, lower to touch the bottom leg and then lift again.
Wall Squat with Yoga Block – The quadriceps, or front of thigh, are the targeted muscles during this exercise but many other muscles get a workout also. The butt, hip, calf, back of thigh, low back, abs, and side abs are all used during this move.
Standing, place an exercise ball against a wall and align it in the small of your back. Position your feet a step, to a step and a half in front of your body such that when you squat down your knees will not protrude past your toes. Place a yoga block between your knees and squeeze. Hold yourself in this position while actively squeezing the block between your thighs. Maintain the pose as long as you can, allowing yourself to come in and out of the pose when you have to, working your way up to being able to hold the position for 1-2 minutes.
I went to a chiropractor who told me that I will need to get physical therapy for my knee. The good news is that she thinks the problem is fixable; the bad news is that I did not hear what the specific problem is. Time to look into it.